SMPP User
This page explains how to install and configure an SMPP user for SMS messaging using the graphical user interface of the Ozeki NG - SMS Gateway software.
Ozeki NG - SMS Gateway allows, among others (see the Users and Applications page), the installation and configuration of an SMPP user.
The software enables all users to connect to the gateway through the Listener port and to exercise their user functions. The creation of an SMPP user account means enabling connection to the Gateway using the SMPP protocol. Anyone who knows the username and the password of a given SMPP user account can connect to the Ozeki NG - SMS Gateway if their IP address is authorized for connection. Once the Gateway has authenticated the user, they are enabled to send and receive messages. Consequently, the creation of an SMPP user allows the Ozeki NG - SMS Gateway to be fully authorized to act as an SMS Centre.

You can use the graphical user interface of Ozeki NG - SMS Gateway to install and configure any user or application.
What is the difference between smpp user and smpp client
The SMPP user is connected to the SMPP client of the Ozeki NG SMS Gateway software. SMPP users also use SMPP protocol when connecting to the SMS Gateway. The SMPP client is connected to the SMPP server of the mobile service provider.
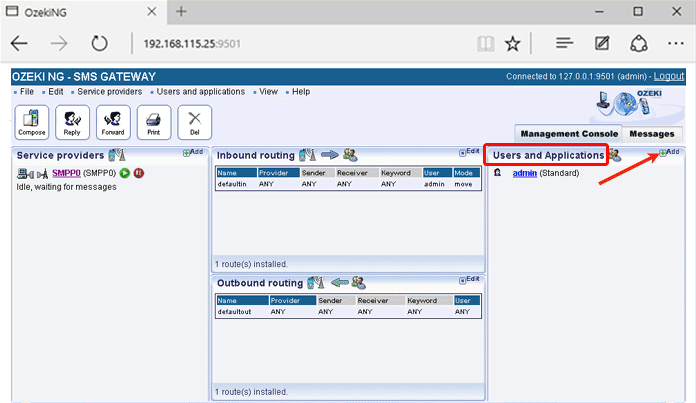
To start installing and configuring an SMPP user, click the Add button in the top right-hand corner of the Users and Applications panel on the right of the Management Console. You can also add a user by clicking the Add user item in the Users and applications menu. (Figure 1).
This will bring up an interface consisting of two panels.
- The panel on the left contains a list of users that have been installed. In the bar at the bottom of the page you can read how many users have been installed.
- The panel on the right contains a list of users that can be installed.
- Each user in the left-hand panel is listed with a unique name (and the user type stated in brackets).
- Each user in the right-hand panel is listed with the name of its type and a brief description of what it can be used for.
An SMPP user allows you to connect SMPP clients to Ozeki NG - SMS Gateway to send and receive SMS messages. Clients can use the SMPP protocol. For connection the clients should use the following settings:
| Host: | The IP address of the computer where Ozeki NG is installed. |
| Port: | 9500 |
| Username: | specified when you create an SMPP user |
| Password: | specified when you create an SMPP user |
| System type: | Ozeki |
| Bind mode: | Transceiver |
| Protocol version: | v3.4 |
To add an SMPP user, click the Install link in the respective entry in the list (Figure 2).
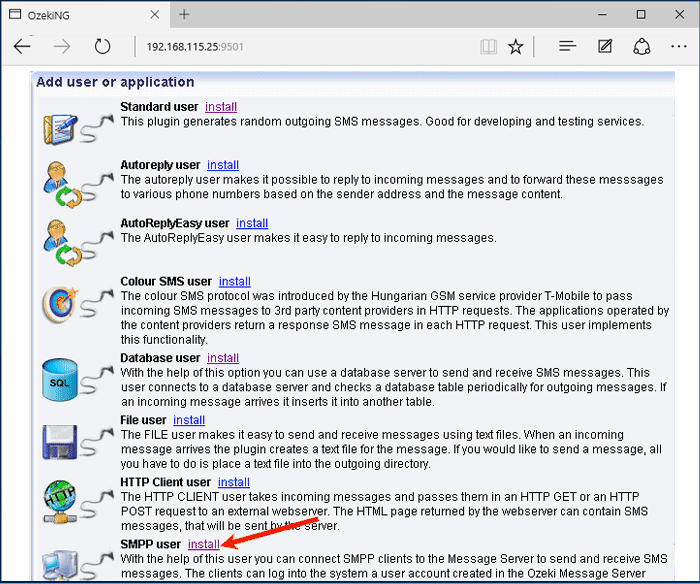
When installing a user (type), you need to give it a unique username. Clicking the Install link will bring up the SMPP user installation panel. Here, you need to enter a unique username in the Username field.
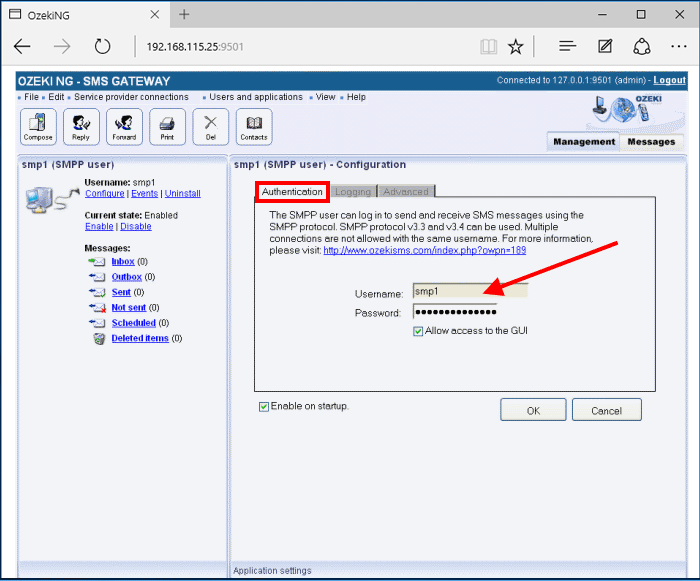
This will take you to the Authentication tab of the Configuration panel.
- The Username field contains the unique username you have provided in the previous panel.
- The Password field contains a password offered by the program. You can and should change it. Your password should be a combination of letters and digits (at least one or two of the latter). From now on, the username and password you have provided can be used to log in to the program (Figure 3).
To configure logging related to the SMPP user, click the Logging tab in the Configuration panel. The tab has a Logging and a Log file settings section. Here, you can choose whether to make the program write log entries about sent and received messages in human readable format and/or log low level communication (SMPP Protocol). You should check at least the Log sent and received messages in human readable format checkbox, as logfiles can be useful in debugging communication problems (Figure 4).
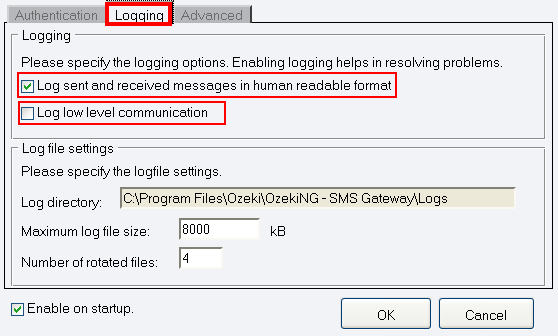
In the Log file settings section of the tab, you can make specifications for the size and the number of available logfiles. Log rotation saves disk space, as it ensures that older (and probably no longer needed) logfiles will be automatically deleted from the log directory, which is specified in the Log directory text box. By default, the access path to the logfiles is: C:\Program Files\Ozeki\OzekiNG - SMS Gateway\Logs
In the Maximum log file size text box in the Logfile settings section, you can specify the maximum size of a logfile. Once this size is reached, a new logfile will be created. Specify the number of kilobytes for the size of a logfile by entering a positive whole number. By default, the maximum logfile size is 8000 kB.
In the Number of rotated files text box, specify the maximum number of rotated logfiles that are saved. Specify this number by entering a positive whole number. By default, the number of logfiles that are saved is 4 (see Figure 4 above).
If you are content with the default specifications, leave the text boxes unchanged.
To modify the configuration or to view server events related to an SMPP user, open the panel of the user's account. To do this, click the name of the user in the Users and Applications panel of the Management Console. In the panel of the user's account, click the link of the task you wish to perform (Figure 5).
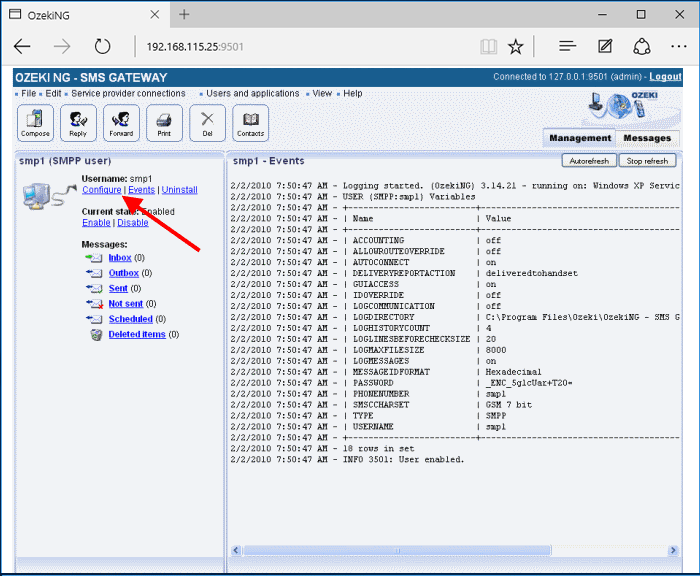
To configure or modify the configuration of the user, click Configure. To view the latest server events related to the user, click Events. To uninstall the user, click the Uninstall link.
More information
