Standard User
This chapter explains how to install and configure a standard user for SMS messaging using the graphical user interface of the Ozeki NG - SMS Gateway software.
Ozeki NG - SMS Gateway allows, among others (see the Users and Applications page), the installation and configuration of a Standard user.
A standard user can use the HTTP user interface to log in to the program to send and receive SMS messages.
You can use the graphical user interface of Ozeki NG - SMS Gateway to install and configure a standard user.
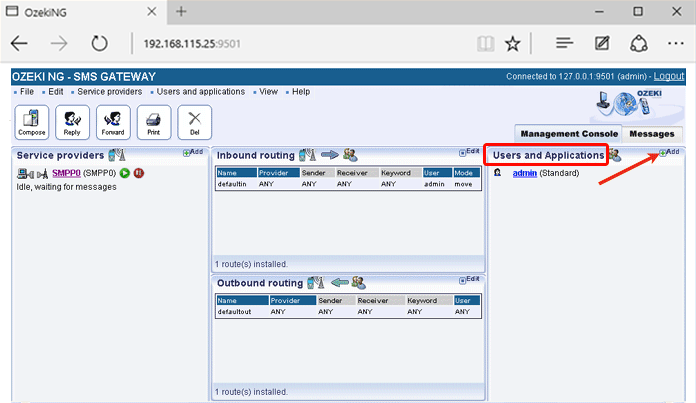
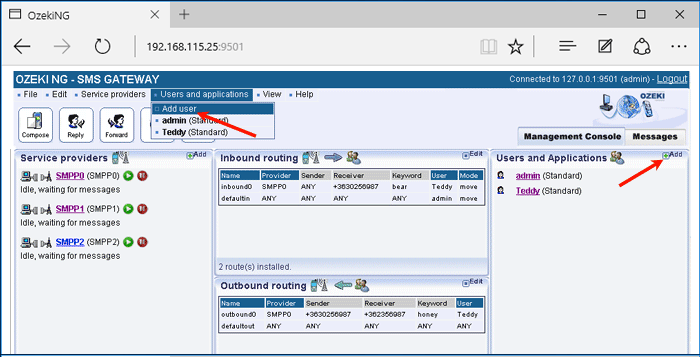
To start installing and configuring a standard user, click the Add button in the top right-hand corner of the Users and Applications panel on the right of the Management Console. You can also add a user by clicking the Add user item in the Users and applications menu (Figure 1).
This will bring up an interface consisting of two panels.
- The panel on the left contains a list of users that have been installed. In the bar at the bottom of the panel you can read how many users have been installed.
- The panel on the right contains a list of users that can be installed.
- Each user in the left-hand panel is listed with a unique name (and the user type stated in brackets).
- Each user in the right-hand panel is listed with the name of its type and a brief description of what it can be used for.
To add a standard user, click the Install link in the respective entry in the list (Figure 2).
When installing a user (type), you need to give it a unique username. Clicking the Install link will bring up the Standard user installation panel. Here, you need to enter a unique username in the Username field.
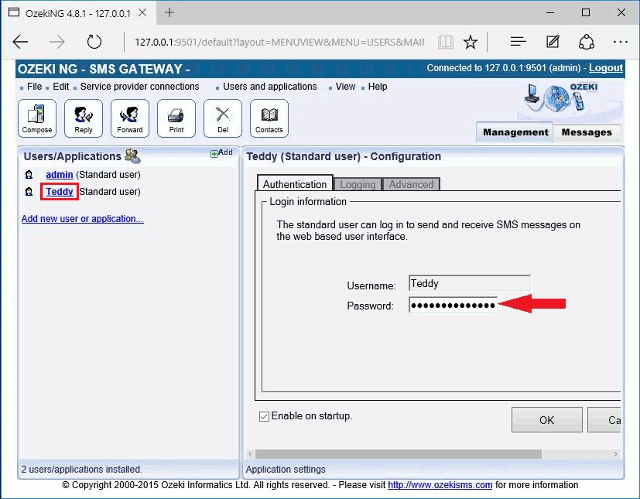
This will take you to the Authentication tab of the Configuration panel.
- The Username field contains the unique username you have provided in the previous panel.
- The Password field contains a password offered by the program. You can and should change it. Your password should be a combination of letters and digits (at least one or two of the latter). From now on, the username and password you have provided can be used to log in to the program (Figure 3).
The name of the logged-in user can be read on the right of the title bar of the graphical user interface of Ozeki NG - SMS Gateway. (See Figure 1 on The Menu page.)
To configure logging related to the user, click the Logging tab in the Configuration panel. The tab has a Logging and a Log file settings section. Here, you can choose whether to make the program write log entries about sent and received messages in human readable format and/or log HTTP communication. You should check at least the Log sent and received messages in human readable format checkbox, as logfiles can be useful in debugging communication problems (Figure 4).
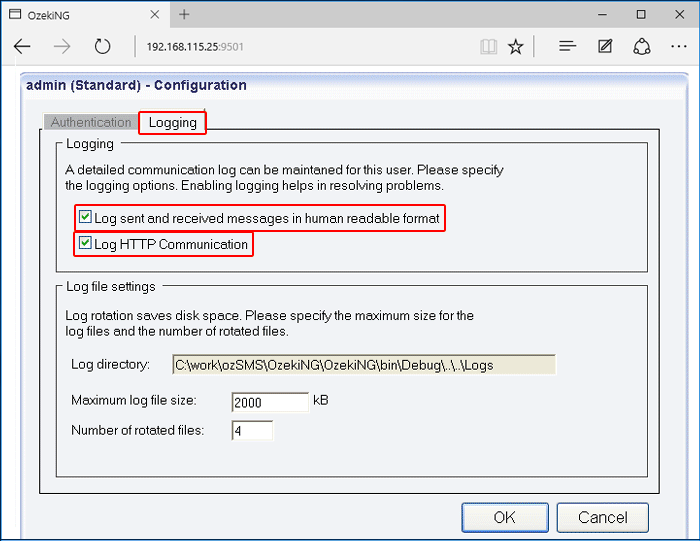
In the Log file settings section of the tab, you can make specifications for the size and the number of available logfiles. Log rotation saves disk space, as it ensures that older (and probably no longer needed) logfiles will be automatically deleted from the log directory, which is specified in the Log directory text box. By default, the access path to the logfiles is: C:\Program Files\Ozeki\OzekiNG - SMS Gateway\Logs
In the Maximum log file size text box in the Logfile settings section, you can specify the maximum size of a logfile. Once this size is reached, a new logfile will be created. Specify the number of kilobytes for the size of a logfile by entering a positive whole number. By default, the maximum logfile size is 2000 kB.
In the Number of rotated files text box, specify the maximum number of rotated logfiles that are saved. Specify this number by entering a positive whole number. By default, the number of logfiles that are saved is 4 (see Figure 4 above).
If you are content with the default specifications, leave the text boxes unchanged.
To modify the configuration or to view server events related to an installed user, open the panel of the user's account. To do this, click the name of the user in the Users and Applications panel of the Management Console. In the panel of the user's account, click the link of the task you wish to perform (Figure 5).
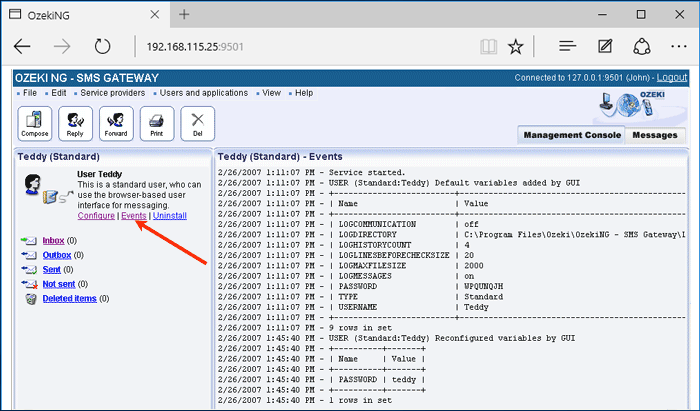
To configure or modify the configuration of a user, click Configure. To view the latest server events related to a user, click Events. To uninstall the user, click the Uninstall link.
