Outbound SMS Routing
This page explains how to configure outbound routing for SMS messaging using the graphical user interface of the Ozeki NG - SMS Gateway software. This guide features step-by-step instructions to enable you to successfully configure outbound routing by editing the outbound routing table. It also includes brief analyses of how the outbound routing table applies to example SMS messages.
Quick overview
Outbound routing is used when you want to send a message. If you have more then one service provider connection, you can use the outbound routing table to configure which connection you wish to use to send the message.
Here is how it works: The outbound routing table has a column called "User" on the right hand side. In this column you define which user will send the message. This user is the "source" of the message. Next to the "User" column there are three columns: "Sender", "Receiver", "Keyword". These three columns are called "Condition". If the message to be sent matches to the conditions, this route will be used. Next to the conditions on the left, you can find the column "Provider". This column is the "Destination" of the message (Figure 1). This means the message will be sent through this service provider connection.
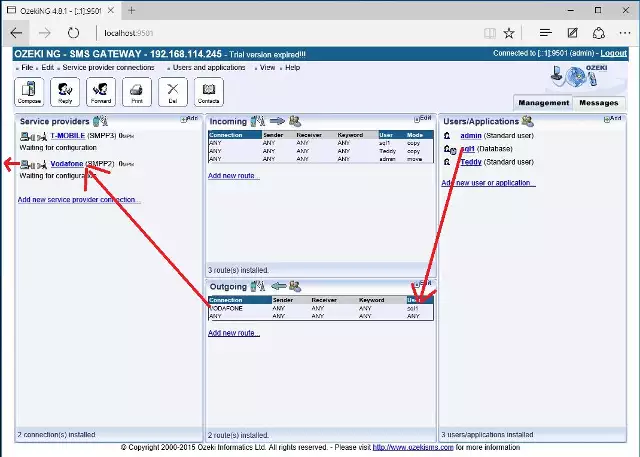
Here is how you should read this table: "If the message is sent by user "sqlexpress" and the condition (Sender phonenumber, Receiver phone number, Message text) matches, this message should be sent using service provider "HttpServer".
Read the full article for more a detailed explanation:
Introduction
The term routing refers to selecting paths in a computer network along which to send data. Routing directs forwarding, the passing of logically addressed packets (e.g. SMS messages) from their source toward their ultimate destination through intermediary nodes (called routers).
In inbound routing the source is a GSM service provider (referred to as Provider in the routing table - see the sections below). In outbound routing the source is a user or application (referred to as User in the routing table).
In inbound routing the destination is a user or application (from now on referred to as user). In outbound routing the destination is a service provider connection.
The routing of both incoming and outgoing messages is defined from the user's viewpoint. The user is a person or a program involved in SMS messaging using Ozeki NG - SMS Gateway.
By configuring the routing of incoming messages, you define for the program which user(s) to deliver an incoming message to (inbound routing).
By configuring the routing of outgoing messages, you define for the program which service provider connection to use when sending out a message from a user (outbound routing).
To route incoming and outgoing messages, you need to set routing rules. You can set routing rules by editing the routing tables of Ozeki NG - SMS Gateway.
The construction of routing tables is essential for efficient routing. You can find an instructive example of configuring outbound routing to reduce the costs of SMS messaging on the Least Cost Routing page. The appropriate configuration of outbound routing is essential for the load balancing feature of Ozeki NG - SMS Gateway. To find out more about it, check out the Load Balancing and the Load Balancing for SMPP v3.3 page.
The software allows you to configure the routing of both
incoming and outgoing messages. To find out how to edit the outbound routing
table and how it applies to example SMS messages, read the sections below.
To find out how to edit the inbound routing table and
how it applies to example SMS messages, check out the
Inbound Routing page.
Editing the outbound routing table
Outbound routing describes the routing of outgoing messages. To configure the outbound routing, you need to set outbound routing rules for Ozeki NG - SMS Gateway.
To set outbound routing rules, you need to edit the outbound routing table of the program.
The outbound routing table is composed of any number of rows of cells. Each row is a routing rule, and each cell contains a directive.
The engine processes the routing table step by step, from the first to the last row. It compares the User and the conditions (Sender, Receiver, Keyword) as directives to the properties of a message.
It goes through the routing rules from top to bottom, checking if the properties of a message match the directives of a routing rule. If there is a match, the program will send out the message using the service provider connection specified in the rule.
Similarly to an incoming message, an outgoing message can be assigned to a destination. The destination, as mentioned above, is one of the service provider connections you have installed and configured. However, the routing of an outgoing message is different from that of an incoming message. When the program has found a rule that is applicable to the message, it will ignore subsequent rules (even if they also match the message). As a result, the software will not use other service provider connections (specified in subsequent rules) to send out the message. The configuration ensures that the message will not be sent out in multiple copies to the same receiver.
To set a rule in the outbound routing table, take the following steps:
Click the Edit button in the top right-hand corner of the Outbound routing panel. This panel can be found in the client area (the middle section) of the Management Console. You can also start editing an outbound routing rule by clicking the Outbound routing item in the Edit menu (Figure 2).
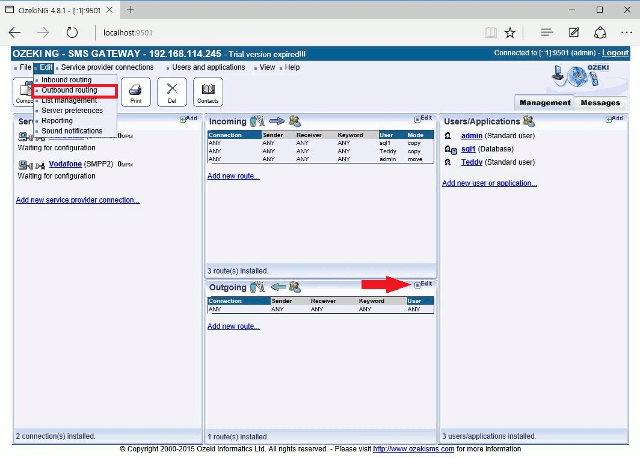
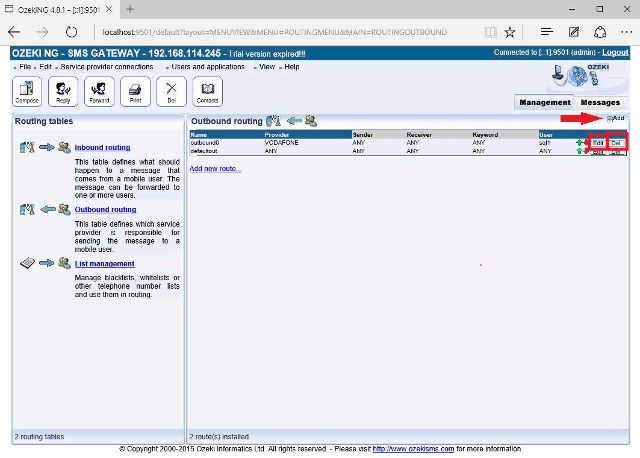
This will bring up a panel where you can choose to add, edit or delete a routing rule. These tasks have respective buttons.
Click the Add button to add a new rule to the routing
table.
To edit (modify) a rule which is already included in the table,
click the Edit button beside it.
To delete a rule included in the table, click the Del button
beside it (Figure 3).
Next, fill in the edit boxes and select the respective items from the dropdown menus. Give a rule any name you like in the Route name edit box.
Specify the user in the Source (User) dropdown menu.
Note that you can only select a user that has been installed and configured.
(To find out how to install and configure users, check out
the Users and Applications page.)
Specify the conditions in the appropriate edit boxes. Enter the sender phone number, the recipient phone number and the keyword. The keyword is the first word of the SMS message.
Finally, specify the GSM service provider connection to send
out the SMS message by selecting it in the Destination (Service
provider) dropdown menu.
Note that you can only select a service provider connection that has been
installed and configured.
(To find out how to install and configure service provider connections,
check out the Service Provider
Connectivity page.)
Click OK when you have finished editing the rule (Figure 4).
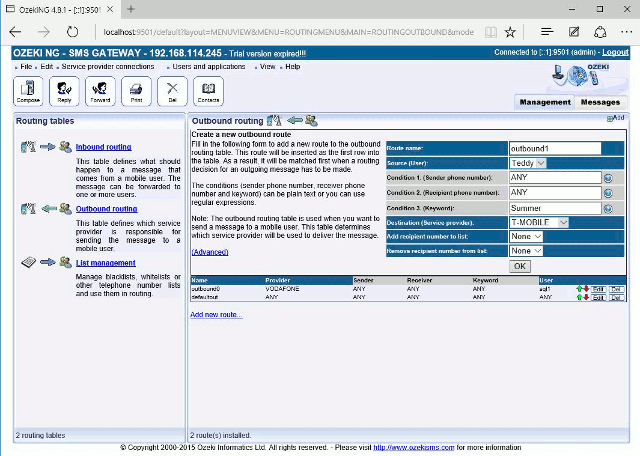
Then the rule will be included in the outbound routing table.
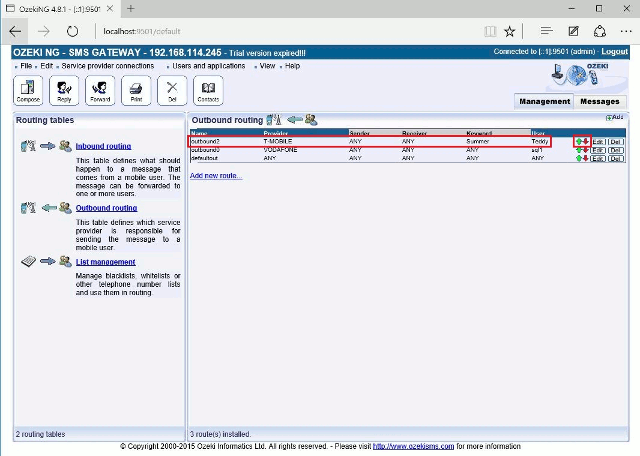
You can change the position of a rule in the routing table.
To move a rule one position higher, click the green arrow beside it.
To move a rule one position lower, click the red arrow beside it (Figure 5).
Routing analyses of example SMS messages
This section provides brief analyses of how example SMS messages are routed according to the example routing table below (Figure 6).
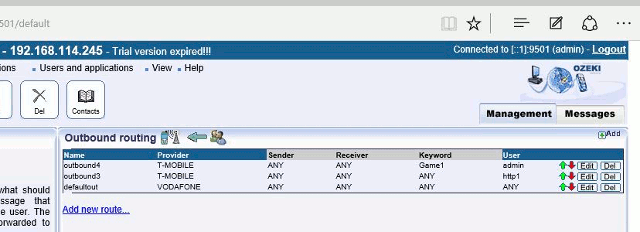
Facts: Vodafone operates with +3670*
T-mobile operates with +3630*
a) User: admin
Sender: +3670123456789
Receiver: +3670987654321
Message: foobar
Routing decision: The message is to be sent out by defaultout
(Vodafone).
Explanation: The message from the 'admin'
user will be sent out by Ozeki NG - SMS GATEWAY using
Vodafone by defaultout. This is because the message text
does not match the keyword specified in
the first routing rule (outbound0). The
username (admin) does not match the username (http1)
specified in the second rule (outbound1) either. The third
routing rule (defaultout) does not specify the user,
the keyword or any of the conditions (there is ANY in
the respective cells). As a result, the message will
be sent out using the Vodafone connection.
b) User: admin
Sender: +36301111111
Receiver: +3670987654321
Message: GAME1 foobar
Routing decision: The message is to be sent out by outbound0
(T-Mobile).
Explanation:
The message from the admin user
will be sent out using T-Mobile by outbound0.
This is because the user matches the
user, and the first word (GAME1) of the message
matches the keyword (GAME1) specified
in outbound0. The routing will finish, and the message will be sent out.
c) User: http1
Sender: +36301111111
Receiver: +3670987654321
Message: foobar
Routing decision: The message is to be sent out by outbound1
(T-Mobile).
Explanation: The message from the http1
user will be sent out using T-Mobile by outbound1. The
first routing rule is not applicable, as the
http1 user does not match the user (admin)
specified in the first rule. It does match, however,
the user specified in outbound1. This rule has
no other specifications (there is ANY in all
the other cells). Therefore, it will apply to this message,
and the message will be sent out using T-Mobile.
d) User: sql1
Sender: +36202222222
Receiver: +3670987654321
Message: foobar
Routing decision: The message is to be sent out by defaultout
(Vodafone).
Explanation: The message from the sql1 user
will be sent out using Vodafone by defaultout.
The first routing rule is not applicable, as the username
(sql1) does not match the username (admin) specified
in the first rule in the outbound routing table in Figure 2.
The second routing rule is not applicable,
as the username (sql1) does not match the username (http1)
specified here either. Consequently, the message is
bound to be sent out using Vodafone by defaultout.
This is because it is a universal (applicable to any
user and any conditions) outbound routing rule
in this example.
FAQs
What is inbound SMS routing and how can I use it?
When an SMS message arrives, inbound routing determines which user or application within your system will receive it.
This is particularly relevant when you have multiple users or applications configured to handle incoming messages.
If you’re dealing with multiple users or applications, you can set up inbound routing rules to define who receives a copy of the incoming SMS.
The decisions for inbound routing can be based on various factors:
- Sender Phone Number: You can route messages based on the sender’s phone number.
- Recipient Phone Number (or Prefix): Route messages to specific users or applications based on the recipient’s phone number or its prefix.
- Message Content: You can even consider the content of the message itself.
- Service Provider Connection: If you have multiple service provider connections, the choice of connection can also influence routing decisions.
