Menu functions of Ozeki NG SMS Gateway
This page provides all the available functions of the main menu in Ozeki NG SMS Gateway. Read this article to know the exact functions that are included in the software and to learn how you can use these features. The screenshots help you find the place of the respective menu items on the interface.
In Ozeki NG SMS Gateway there are two main consoles: the "Management Console" and "Messages" view. The main menu that can be found at the top of the page is available from Management Console and Messages view, as well. The following icons are also accessible from both consoles: "Compose" to compose a new message, "Reply" to an incoming message, "Forward" to forwards messages, "Print" to print messages, "Delete", and "Contacts" to open the addressbook (Figure 1).

File menu
If you go from left to right on the menu items, you can see the first one is "File" sub menu. If you click on "File", you can choose from composing a new message or leaving the program by "Exit". If you click on "New message" you can start to compose a message and send it to the respective recipient (Figure 2).

Edit menu
In "Edit" sub menu you can find more menu items. At first you can select "Inbound routing" function that allows you to edit inbound routes of messages. The other function is "Outbound routing" that is logically refers to editing the routes of outgoing messages. The term routing refers to selecting paths in a computer network along which to send data (Figure 3).

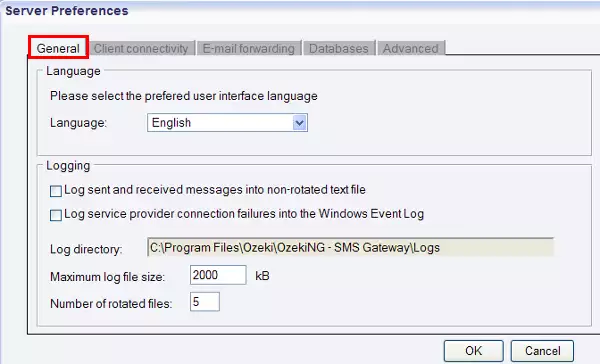
The next menu item in "Edit" sub menu is "Server preferences". If you click on it, you will find four tabs to be configured. In "General" tabs you can select the preferred user interface language; and logging also can be set. You can define the path to log directory, the maximum log file size and the number of rotated files (Figure 4).
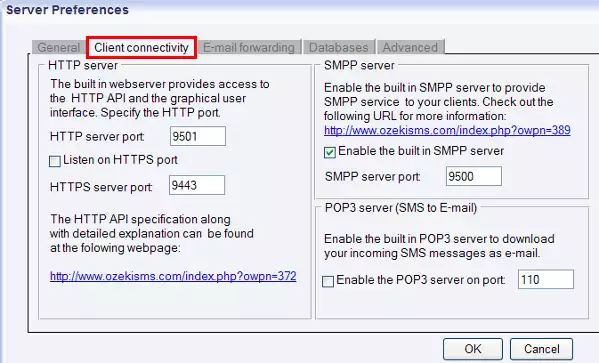
At "Client connectivity" tab you can enable the built-in servers of Ozeki NG SMS Gateway (Figure 5).
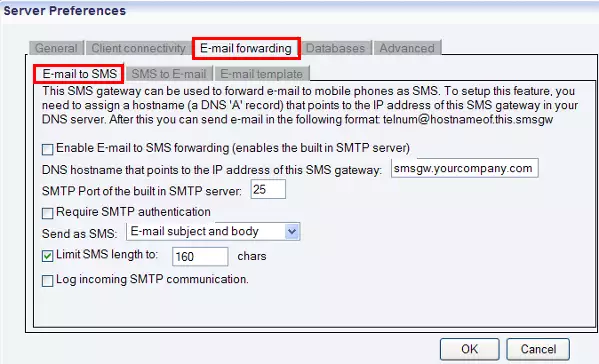
At "Email forwarding" tab in Server preferences menu you can set the built-in SMTP server
and further parameters for Email-to-SMS and SMS-to-Email messaging.
Email to SMS the following parameters can be specified (Figure 6):
Check Enable email to SMS forwarding (enables the built in SMTP server) checkbox.
The full domain name that will be used for reaching the Email to SMS server at
DNS hostname that points to the IP address of this SMS gateway field.
The port can also be customized if it is required at SMTP port of the built in "SMTP server" field.
If authentication is needed, "Require SMTP authentication" checkbox can be enabled.
You can specify which part of the email should be sent as SMS: Only the email
subject, Only the email body, Both the Email subject and body.
It is also possible to specify the character limit for SMS text messages. Please note that
if the limit is not specified the whole email message will be sent as multipart SMSs.
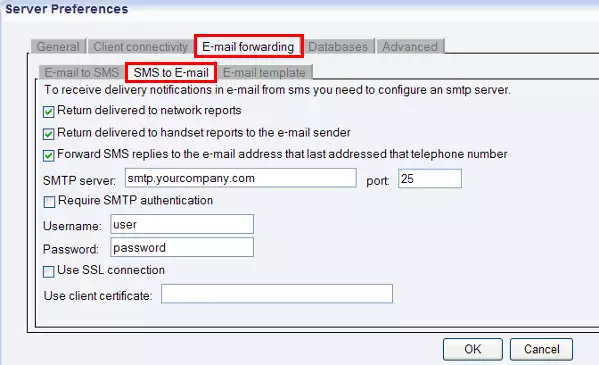
Now still on the Email forwarding tab of Server preferences menu there is "SMS to
Email" tab (Figure 7). Here you can select what type of notifications you wish to
receive about your messages. To be able to receive these SMS to Email notifications
you need to configure an SMTP server.
You can enable "Return delivered to network reports to receive a notification
if your message has been delivered to the GSM network".
You can also enable "Return delivered to handset reports to the email sender" option.
If you wish to receive a response message from the recipient mobile phone via email
(SMS to Email) you need to enable "Forward SMS replies to the email address that last
addressed that telephone number checkbox".
You need to specify the SMTP server through which response messages will be forwarded.
You can customize the port number if it is required.
If you wish to use username and password for authentication, please enable "Authentication
required checkbox" and specify the Username and password.
If the SMTP server uses encrypted connection, please enable "Use SSL connection" option.
In case the encrypted connection uses a certificate from an external file, you can
provide the full path of the file at "Use client certificate" field.
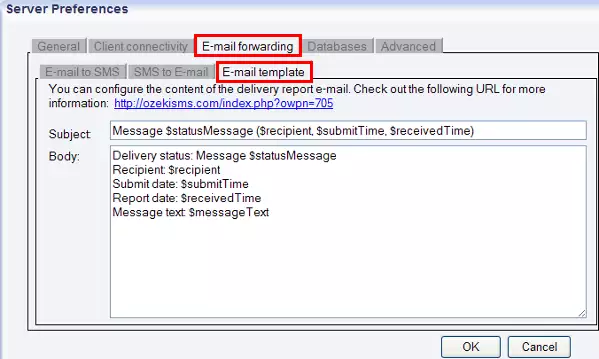
At "Email template" tab you can configure the content of delivery report email, such as the Delivery status, the Recipient, the Submit date, Report date, Message text (Figure 8).
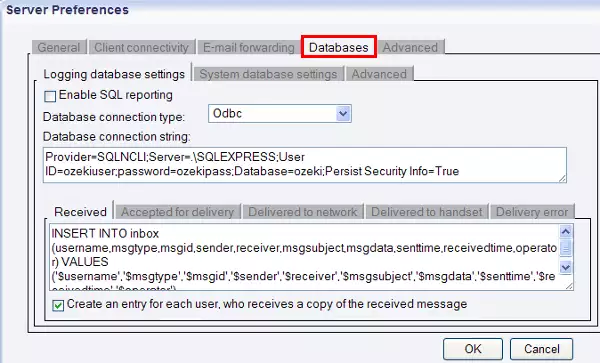
At "Databases" tab you can select the database connection type and you can provide the database connection string (Figure 9).
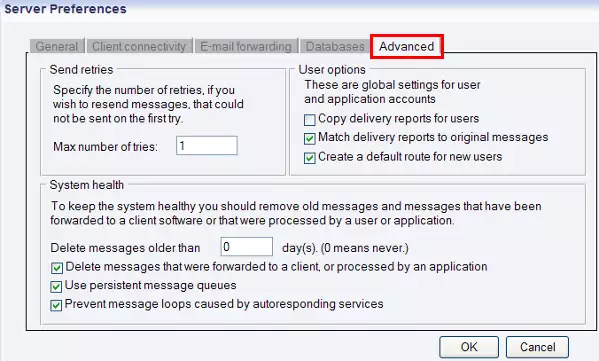
At "Advanced" tab you can configure the maximum number of retries of your messages that are not sent on the first time. In "User options" you will find the global settings for user and application accounts. Finally, "System health" option makes it possible to keep the system "healthy". It means that older messages need to be deleted to give place for new ones. Here you can specify which messages should be removed (Figure 10).
In "Edit" menu two sub menus are left. The first one is "Reporting" function. In order to use this feature, you must configure SQL Logging on the server preferences form. For more information please visit SQL logging page. The other menu item is "Sound notification". With this feature of Ozeki NG SMS Gateway you can play wav files or read out text on message delivery events. On this page you can configure this feature by specifying which events to use, the wav file location with full path, and type in the text to read out.
Service provider connections menu
The next menu item in the main menu is "Service provider connections". If you click on "Add service provider connection" option in this menu item, the program lists all the possible connection types. You can select the most proper for you from the list and click on "Install" to install the new service provider connection (Figure 11).

If you have an installed service provider connection on your computer, you can see all its information if you click on its name in this "Service provider connections" menu. This function allows to reach functions of the given connection such as view its events, configure, connect, disconnect, or uninstall the connection (Figure 12).

Users and applications menu
"Users and applications" menu is the next item in the main menu. First, it includes "Add user" function (Figure 13). If you click on "Add user" the program lists all the possible user connections. You just need to select the best for you and click on "Install" next to its name to install a new user in the program.

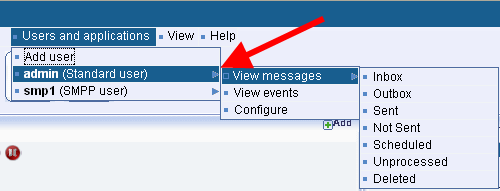
In "Users and applications" menu the details of the admin user (standard user) and of the installed users, are also available. If you move the mouse pointer to one of the installed user, for example, to the admin user, an option list is scrolled down: so you can view messages (Inbox, Outbox, Sent, Not sent, Scheduled, Unprocessed, Deleted), view events of this user and you can configure it, as well, from this menu (Figure 14). In case of the installed user, you will also find an "Uninstall" option in its scrolled down list.
View menu
The last but one menu is "View" menu. This menu provides convenient availability for the main functions of Ozeki NG SMS Gateway. Therefore, you can go to the following functions with one click: "Messages" and "Management console", and you can also check the "Server load", "User queue overview", "Delivery report registry", and "Server events" (Figure 15).

Help menu
Finally, there is a "Help" menu in which you can find "On-line documentation". This is a link that leads you to the official web site of Ozeki NG SMS Gateway where detailed guides and instructions are provided. The second menu item is "Error codes". Here the possible error codes are listed in order to speed up the identification and solution of problems. Under "Registration" you can start the product activation process after purchasing the software. In "About" menu item you will find a link to the official web site of Ozeki Informatics Ltd and an e-mail address, as well (Figure 16).

Learn more!
People who read this also read...
- Technical datasheet of Ozeki NG SMS Gateway
- Learn the key features of the software
- Find out the SMS features of the SMS gateway
- Learn the MMS functions of Ozeki NG SMS Gateway
- Browse through the functions of the Management Console
- Be familiar with Messages view
- Learn how to send mobile messages from Ozeki NG SMS Gateway
More information
- Key features of SMS Gateway
- Menu functions of Ozeki NG SMS Gateway
- Management Console of Ozeki NG SMS Gateway
- Messages view functions of Ozeki NG SMS Gateway
- Sending SMS messages from Ozeki NG SMS Gateway
