How to setup your application for Ozeki NG SMS Gateway?
Ozeki Android SMPP SMS Gateway helps your business to achieve significant goals in the most innovative way. As you will see below, installing and configuring your Ozeki Android SMPP SMS Gateway as an SMPP Service Provider is really simple. Take a look at the following step-by-step guide and run along with the instructions.
Installation steps
- What you need
- Establish Internet connection
- Installation of Ozeki Android SMPP SMS Gateway
- Connecting the Ozeki Android SMPP SMS Gateway to a computer
- Network settings in the Ozeki Android SMPP SMS Gateway
- Logging in Ozeki NG SMS Gateway
- Configuration in Ozeki NG SMS Gateway
What you need
In order to send and receive SMS messages from your corporate IT system, you need to connect Ozeki Android SMPP SMS Gateway and Ozeki NG SMS Gateway. For this purpose, you need to insert a SIM card into the smartphone on which you have installed the application. In Figure 1 you can see the accessories:
- Android Mobile Phone: Ozeki Android SMPP SMS Gateway is compatible with Android operation system. Sony Ericsson, Samsung, Motorola, HTC, LG and Alcatel also apply this OS. At least Android 8.0 is required. In addition, a SIM card is required. SIM card is used to provide connection to a GSM service provider. You can use your existing SIM card placed in your Android-based smartphone, or you can buy a new one directly from a GSM service provider.
- Ozeki Android SMPP SMS Gateway Application: This is an application, which replaces conventional GSM modems. It is a gateway that allows you to send SMS messages from the Ozeki NG SMS Gateway toward the GSM network. You can download Lite and Full versions from Google Play, or you can order Full Plus edition directly from Ozeki. Compare the 3 editions
- Windows PC: In order to use your smartphone as an SMS Service Provider you need Ozeki NG SMS Gateway, which is compatible with Windows operation system. So, there is a need for a Windows PC.
- Ozeki NG SMS Gateway: Ozeki NG SMS Gateway for Windows is a software that makes it possible to connect your system to the mobile network. Due to this software, you can send and receive SMS messages as well. You can order it directly from Ozeki.
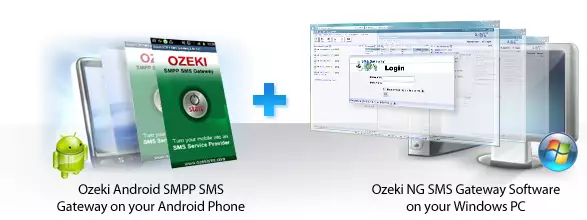
Figure 1 - PrerequisitesEstablish Internet connection
First of all, you need to setup Internet connection on your Android phone. For this purpose, you can use WI-FI or your Mobile Internet subscription. Follow the instructions below to establish Internet connection:
- WI-FI: In order to setup and manage wireless access points you need to select Settings, then Wireless and networks and finally WI-FI settings menu items. Turn on WI-FI by ticking "WI-FI" in the checklist, then select the appropriate WI-FI network from the list that appears below. If necessary, enter the password, then click on the "Connect" button.
- Mobile network: If you have a Mobile Internet subscription you need to follow these steps: Select Settings, then Wireless and networks and finally Mobile networks menu items. Now click on "Use packet data" in the checklist to enable data access over mobile network.
Installation of Ozeki Android SMPP SMS Gateway
After you have downloaded Ozeki Android SMPP SMS Gateway, your Android operation system installs the application automatically. After installation you will see the followings on your mobile phone: (Figure 2):
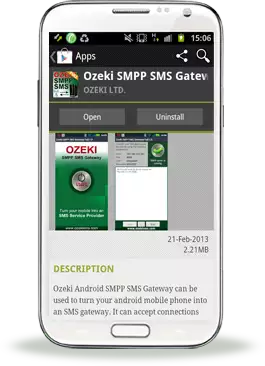
Figure 2 - Ozeki Android SMPP SMS Gateway installed successfullyAfter installation the following icon (Figure 3) will appear on your smartphone menu (Figure 3):
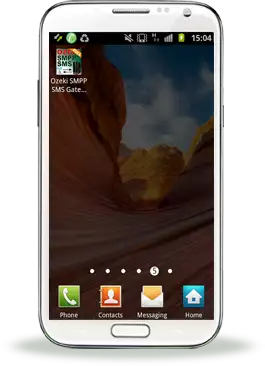
Figure 3 - Ozeki Android SMPP SMS Gateway iconClick on the icon to launch the application. You will see the following screen on your phone (Figure 4):
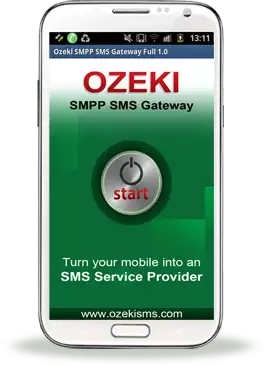
Figure 4 - Ozeki Android SMPP SMS Gateway home screenActivate your license
In case of Full Plus edition, you need to activate your trial version in order to use your application beyond the trial period. After you paid for the application using your PayPal account, you will get the activation code.
Connecting the Ozeki Android SMPP GSM Gateway to a computer
Through WI-FI or over the Internet you can connect Ozeki Android SMPP SMS Gateway to your computer. There is no need for any phone-to-PC data cable.
Networks settings in Ozeki Android SMPP SMS Gateway
First, click on the "Start" button in the middle of the screen (see above in Figure 4). After starting the application different parameters appear on the top left-hand side of the screen (Figure 5). You need to use these parameters in Ozeki NG SMS Gateway Management Console.
In order to launch your Android mobile phone as an SMPP Service Provider you need to click on "Start" button in the bottom left-hand corner of the screen. As a result, a "green tick" and the "SMPP server is running" message appears in the top right-hand corner of the screen (Figure 5).
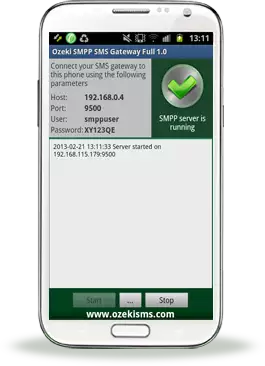
Figure 5 - SMPP server is runningIf you want to stop SMPP server, you have to click on "Stop" button in the bottom right-hand corner of the screen. Now, in the top right-hand corner of the screen you can see a "red X" and the following text message: "SMPP server is stopped" (Figure 6). "..." button brings up the menu.
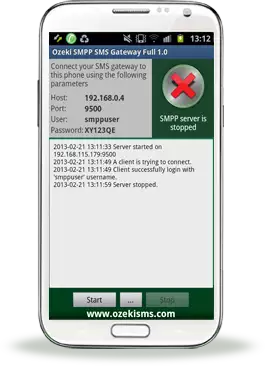
Figure 6 - SMPP server is stoppedLogging in Ozeki NG SMS Gateway
After you have opened Ozeki NG SMS Gateway, you need to login to the user interface (the management console). In the login window, enter your username and password (Figure 7). If you need assistance for login, please take a look at Ozeki NG SMS Gateway Quick Start Guide.
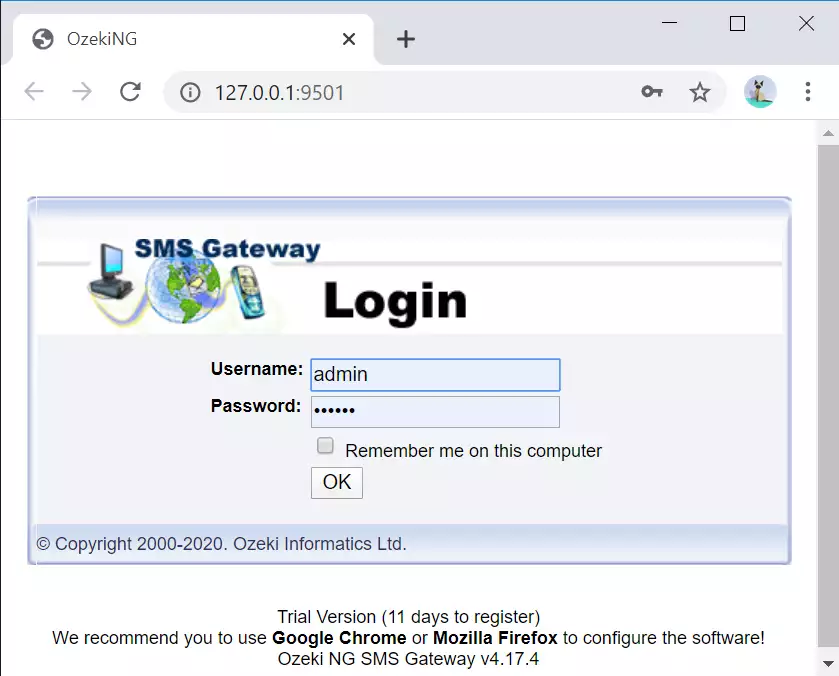
Figure 7 - Ozeki NG SMS Gateway login screenConfiguration in Ozeki NG SMS Gateway
In the next step, you need to install and configure SMPP (Short Message Peer-to-Peer) connection. There are three ways to start the installation:
- Click "Add" button in the top right-hand corner of the Service Providers panel on the left of the Management Console interface, or
- Click "Add service provider" text link in the bottom left-hand corner of the Service Providers panel on the left of the Management Console interface, or
- Click "Service providers" menu item on the top bar, then select "Add service provider" item.
After you have completed one of these actions, the Add service provider panel will appear on the right side of the GUI. This panel contains a list of protocols you can install and use for communication with an SMS service provider.
Look for "SMPP Connection", then click on the "Install" text link to select the SMPP protocol (Figure 8).
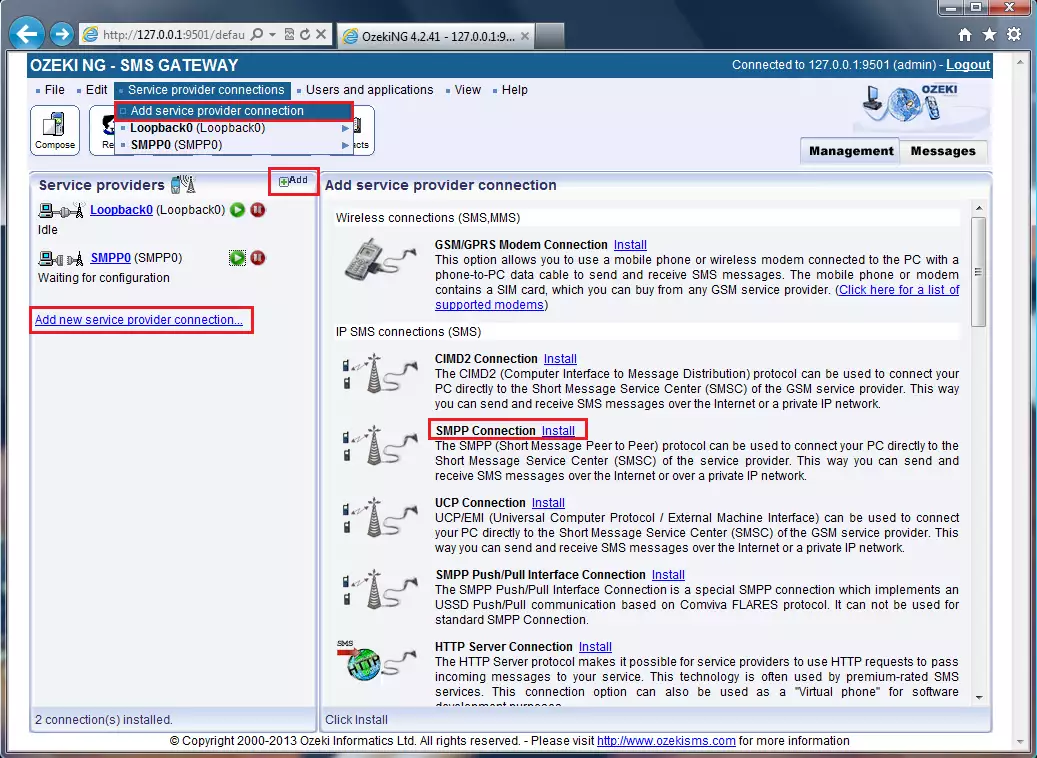
Figure 8 - Adding a new SMPP connectionNow the SMPP Configuration panel appears on the right side of the interface. The first tab is the SMPP settings, where you can specify the SMPP server settings. You need to specify the following parameters: host name, port number, username and password. Check out these data in your Ozeki Android SMPP SMS Gateway (on the top left-hand) and enter the appropriate information (Figure 9).
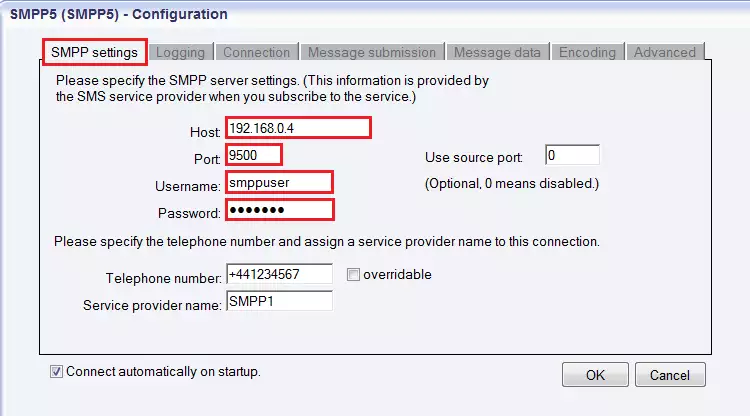
Figure 9 - Specifying the SMPP server settingsIn the fields below, enter the telephone number used to this connection and the service provider name. Select a clearly distinguishable and well-defined connection name and give different names for different connections. Specify the information in the edit boxes. When you enter the phone number you should use international format, so start with "+". It is a required information. Do not leave this field empty, otherwise SMS sending will fail.
You can tick the "overridable" checkbox on the right side of the Telephone number edit box. This grants that you can replace the phone number specified in the Telephone number edit box with a different one to be displayed as the sender of an outgoing message. You can also replace the number with text (it can contain up to 11 characters). As a result, before you send your message, you can enter any different phone number or a name as the sender ID of the message.
In order to configure logging, click the next tab. It is called "Logging". This tab consists of 2 parts: "Logging" and "Log file settings" sections. Here, you can select the program to make log about sent and received messages in human readable format and/or log low level communication. If you choose the second option, the program will make log files including binary codes representing the communication data.
Tip: Select at least the "Log sent and received messages in human readable format" option, because logfiles can help to solve communication problems (Figure 10).
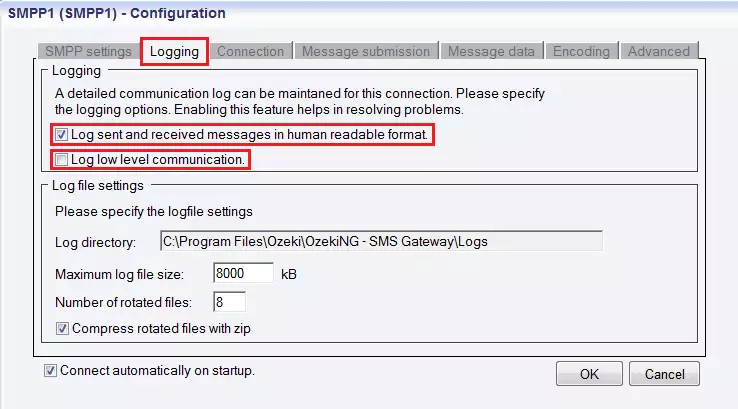
Figure 10 - Settings on the Logging tabThe second part of the tab is Log file settings, where you can setup the size and the number of available logfiles. Log rotation saves disk space, since it grants that older (and probably no longer needed) logfiles will be deleted automatically from the log directory. You can enter the Log directory manually, or you can use the default, which has the following access path: C:Program FilesOzekiOzekiNG - SMS GatewayLogs.
You can enter the maximum size of a logfile below. If the logfile reach this size, a new file will be created. The default maximum logfile size is 8000 kB. You can type an individual value by entering a positive whole number.
The next edit box is Number of rotated files. It contains the maximum number of rotated logfiles that are saved. You should enter a positive whole number. By default, it's value is 8 (as you can see Figure 10 above). If you use the default specifications, do not change this text boxes.
In the Configuration panel the next tab is Connection. Here you can enter protocol-specific options and specify NPI and TON settings (in the left section). On the right side you can make communication link management settings.
You can select a protocol version by ticking either of v3.3 or v3.4.
Below you can enter the System type. It is for assigning the protocol standard of the other side (SMSC). This information is specified by the service provider.
The Bind mode describes the way of communication between Ozeki NG SMS Gateway and the SMSC of a Service Provider. In this section you can choose Transmitter, Receiver or Transceiver. If you use this connection only for sending SMS messages, choose Transmitter. If you use this connection only for receiving messages, choose Receiver. If you use this connection for sending and receiving messages as well, choose Transceiver.
Under Bind mode settings you can also find edit boxes for TON and NPI settings. TON refers to Type Of Number, while NPI is the acronym for Network Protocol Identification. In this fields, you should enter numbers. This information is provided by the GSM service provider (Figure 11).
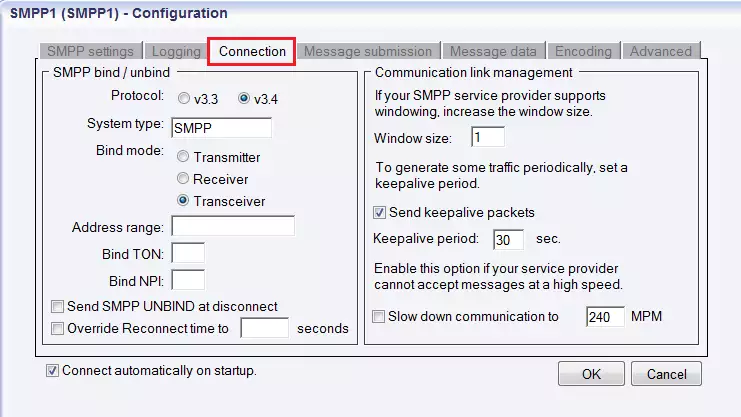
Figure 11 - Connection tabIn the right side of the Communication tab, you can control communication links. The first setting is "Windows size", where you can increase the window size, if windowing is supported by your SMPP service provider.
If you tick the Send keepalive packets checkbox in this Communication link management section, you can make the program send keepalive packets to maintain connection. Proxy servers will drop a connection after a short period of time if there is no activity on it. Keepalive packets are sent during idle periods to keep the connection open.
In this checkbox you can enter the maximum length of idle connection between the Ozeki NG SMS Gateway and the SMS Centre of the Service Provider. You should specify any positive whole number. If the default specification (30 seconds) is appropriate for you, do not change this edit box.
Finally, in this tab you can also check the Slow down communication to checkbox if your service provider cannot accept messages at a high speed.
The next tab in the Configuration settings is Message submission, which consists of two parts: Delivery reports and Submit timeout handling. In "Delivery reports" section you can activate Request delivery reports option. Delivery reports are messages about the delivery status of the sent messages. They are returned by the service provider when your message arrives to the recipient mobile device. In the next edit box (Delivery date format) you can enter the date format used by your service provider in delivery reports.
The right side of the panel is Submit timeout handling, where you can specify the preferred way to manage submit timeout. In the Submit timeout edit box you can enter the maximum waiting time for an SMSC response confirming that your message has been successfully submitted. A submission is successful if the SMSC has accepted the message for delivery. In this field you should use numerical characters representing any positive whole number. If the default specification (60 seconds) is appropriate for you, do not change this setting.
In addition, if there is no response from the SMSC after the defined length of time, you can choose the message status. Select one of the following radio buttons: If there is no response from the SMSC, select "Sent" to consider a message sent even. If there is no response from the SMSC, select "Not sent" to consider a message not sent (Figure 12).
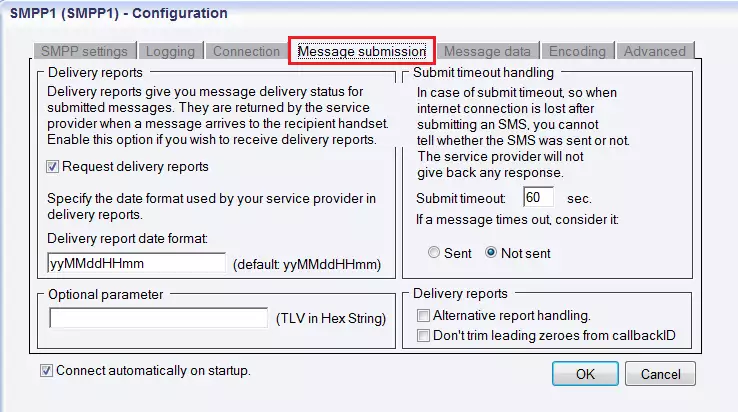
Figure 12 - Message submission tabAs you can see in Figure 11, the next tab is Message data. It also contains two main sections: "Character encoding of text messages" and "Message data transport". First, you can enter the preferred character set (Default, ISO_8859_1, UCS2, GSM7bit) and the character encoding policy (Best match, Transform, Enforce).
Best match: Converts to preferred character set if lossless conversion is possible. (Character substitutions are not allowed.)
Transform: Converts to preferred character set if possible. (Character substitutions are allowed.)
Enforce: Always uses the preferred charset. (Character substitutions and character losses are allowed.)
Then you can setup one of the following options if it is required: Use GSM 7 bit packed encoding, Encode @ sign as iso 8859-1 character, Convert incoming GSM 7 to iso 8859-1.
In the right side of the panel you can find "Message data transport" section. You can check segmentation and reassembly (SAR) in order to automatically split outgoing messages and reassemble incoming messages if needed as long messages should be sent via the mobile network in several parts.
Since some service providers might ask you to use TLV fields instead of the standard SM field, in the last section you can select from the following options:
Put UDH into TLV for binary SMS
Put UDH into TLV for text SMS
Put msg data into TLV instead of SM field
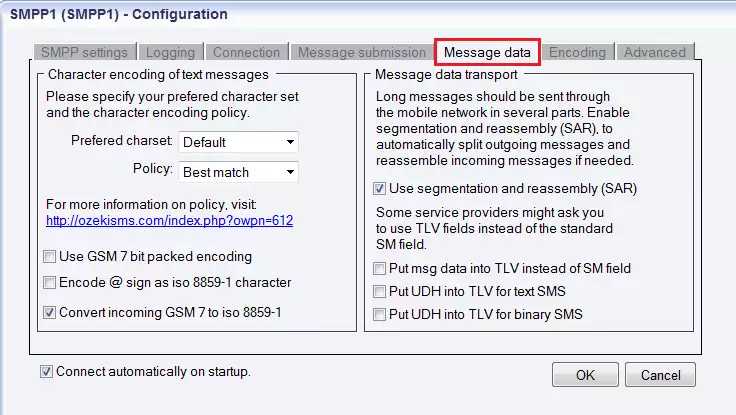
Figure 13 - Message data tabThe next tab is Encoding. Here you can find the following sections: ESM Class field, Number format encoding, DCS field, Service type. In ESM Class section you can choose from these options:
Put Delivery Report Req. into ESM class
Put UDHI into ESM class for text SMS
Put UDHI into ESM class for binary SMS
In case your service provider asks you to set ESM class field to 00 for all messages, leave these fields unchecked.
In the right side of the panel, in Number format encoding section you can specify TON and NPI numbers. At the bottom of the panel, you can specify DCS that determines the charset, the message class and binary message encoding, and service type parameter of SUBMIT SM PDU (Figure 12).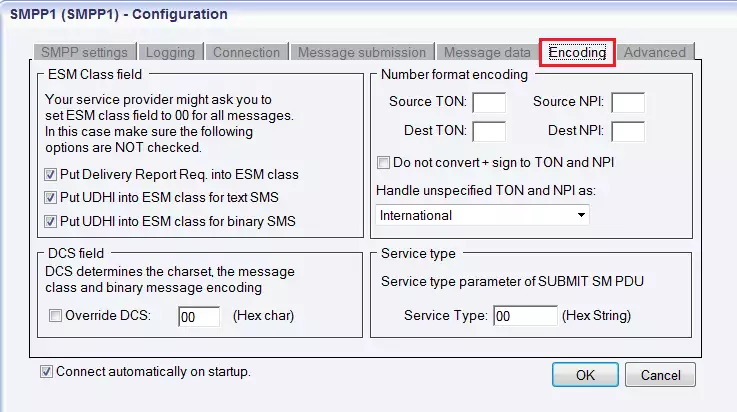
Figure 14 - Encoding tabThe last tab on the Configuration panel is Advanced tab (Figure 13). In this section you can specify the Service type parameter of DELIVER_SM PDU. Its default value is 0. If it is appropriate for you, do not change this setting.
The other section is SMPP Error Handling, where you can specify that when the transfer for this connection should stop. It should stop when Throttling Error or Message Queue Full Error is received. You have to enter any positive whole number.
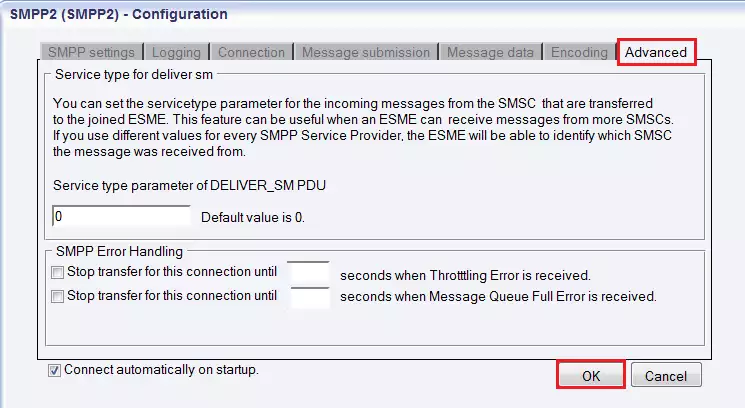
Figure 15 - Advanced tabAfter configuration click on "OK" button. If the Advanced tab Connect automatically on startup checkbox was checked in the bottom left-hand corner of the panel, Ozeki NG SMS Gateway will automatically initiate a connection with the SMSC. If this checkbox is not checked, you need to initiate connection manually.
To initiate the connection manually, click the Connect link in the left side of the screen (in the panel of the service provider connection) (Figure 16).
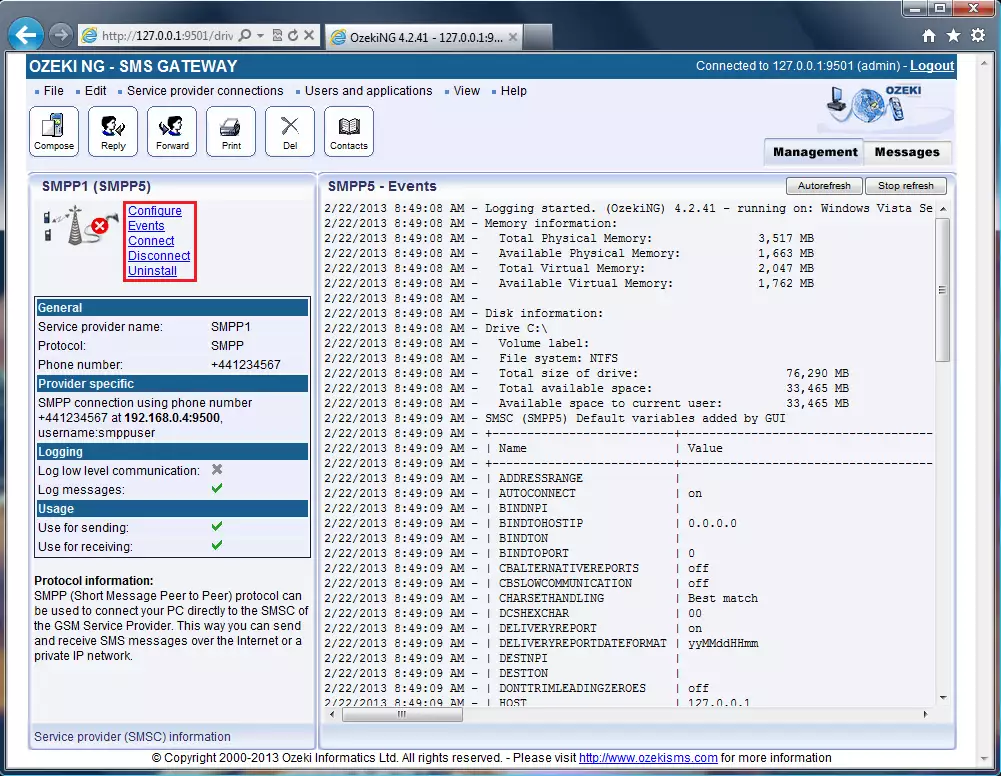
Figure 16 - Links to operationsIf you click on the name of a service provider connection in the Management Console, you can open the panel of the service provider connection.
This panel consists of three sections.
On the top of the panel you can find the name of the service provider connection (with the name of its protocol in brackets).
You can see an icon, which shows the status of the service provider connection. If it is not connected, the icon is marked with an "X".To the right of this icon, you can find text links to perform different operations.
Configure: this hyperlink leads back to the configuration panel, which allows you to configure or modify the configuration of an installed service provider connection.
Events: click on this link to bring up the Events panel. You can use this option to view the logging of the latest server events related to the service provider connection.
Connect: click on it to connect the service provider connection with the SMS Centre.
Disconnect: click on it to disconnect the service provider connection from the SMS Centre.
Uninstall: this option allows you to uninstall the service provider connection.In the middle part of the panel, you can see some of the most important configuration information. The options that have been (re)activated during the configuration are checked with a tick. The options, which have not been activated or those that have been deactivated during the configuration are marked with an "X". At the bottom of this panel, you can find some protocol information.
Now your Android mobile phone is able to send bulk SMS messages. If you need more information to send new messages, please study Ozeki NG SMS Gateway Quick Start Guide.
Conclusion
This guide above introduced how to setup Ozeki Android SMPP SMS Gateway for Ozeki NG SMS Gateway. If you follow these steps, you will be able to establish connection between the GSM network and the IP network quickly and easily.
If you have any questions or need assistance, please contact us at info @ ozekisms.com
Get more information!
People who read this also read...
|
More information |

|
|
Learn more about allowing and installing Third-party Apps. |
 |
Provide SMS services with Ozeki Android SMPP SMS Gateway. Click here to details. |
|
|
|
|
|
Find out more about the editions: Lite, Full, Full Plus. Choose the best one. |
|
Ozeki Android SMPP SMS Gateway Lite is a limited edition, while Full Plus has trial version. Read more about limitations. |
|
vs GSM modem Discover the differences between the 2 devices in side-by-side comparison style. |
|
Technical details about the revolutionary Android-based SMPP SMS Gateway application. Learn more from our experts. |