The Menu
This page introduces the menu of the Ozeki NG - SMS Gateway software. You can learn what each menu item can be used for.
The menu of the software provides you with convenient access to various operations to manage service provider connections, users and applications involved in SMS messaging. It allows you to access panels related to composing, sending and routing SMS messages. It also enables you to access a registration panel, and it offers a shortcut to the online documentation of the product.
The menu bar can be found immediately below the title
bar of the Management Console interface, which you can see after
logging in to the program. (For login information,
check out the QuickStart Guide.)
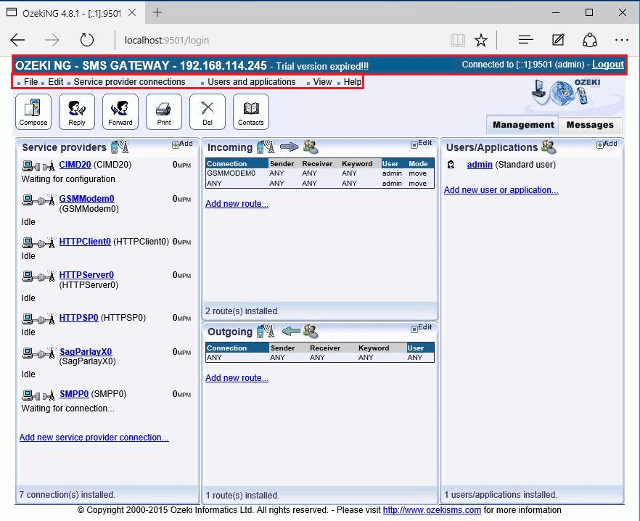
On the left of the title bar you can see the name of the program. On the
right you can see which port you are connected to, the name of the logged-in
user, as well as a link to log out.
In the menu bar, immediately above the toolbar, you can see the name of the different menus (Figure 1).
The sections below will explain what the items of each menu can be used for.
The File menu
The File menu consists of two items: New message and Exit (Figure 2).
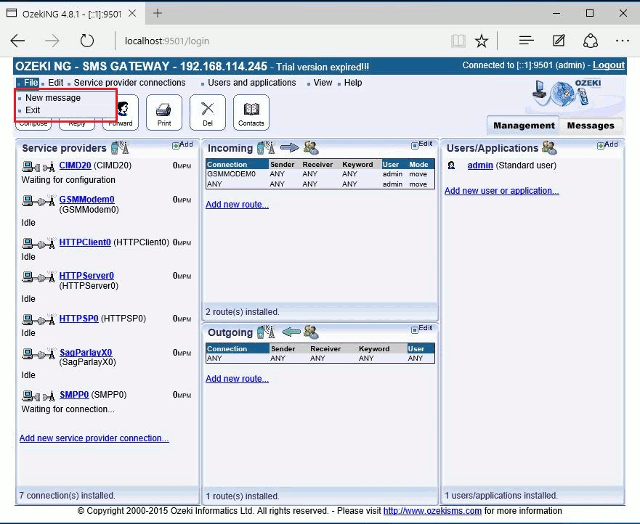
If you select New Message, you will open a screen where
you can edit a new SMS message to send.
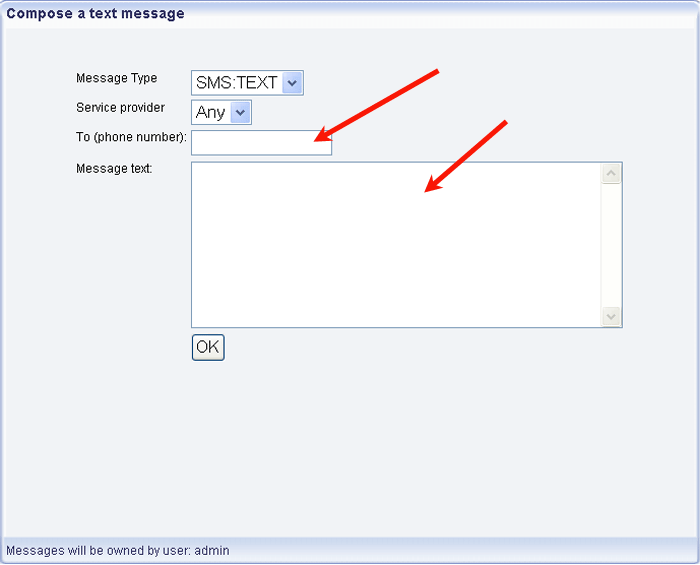
It contains two dropdown menus and two edit boxes.
In the Message Type dropdown menu you can select the type of the
message you are composing.
In the Service provider dropdown menu you can select the service
provider connection you want to use to send out the message.
The To (phone number) edit box is for the recipient telephone number.
Please note that the phone number
needs to be entered in international format: starting with "+".
The Message text box is for composing the message (Figure 3).
You can also start to compose a new message by clicking the Compose button in the toolbar. For more details, check out The Toolbar page or the Quickstart Guide.
If you click Exit, you will get back to the login screen of the program.
The Edit menu
In "Edit" sub menu you can find more menu items. At first
you can select "Inbound routing" function
that allows you to edit inbound routes of messages. The other function is
"Outbound routing" that is logically refers
to editing the routes of outgoing messages. The term routing refers
to selecting paths in a computer network along which to send data (Figure 4).
Selecting either of them will bring up the respective panel for editing routing
rules.
For more information, check out
the Quickstart Guide,
the Inbound Routing or
Outbound Routing page.

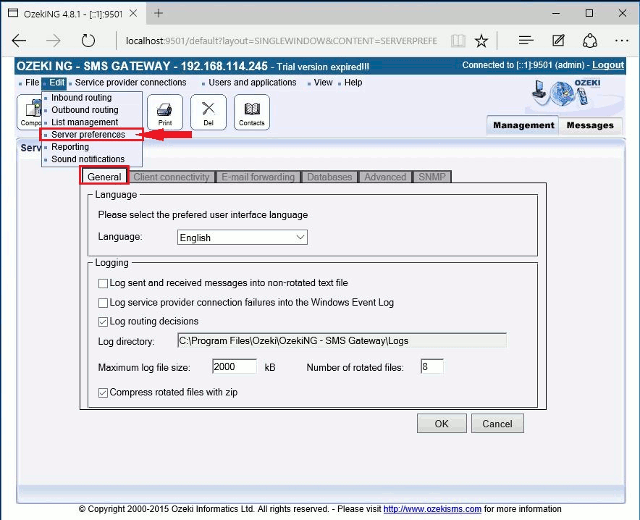
The next menu item in "Edit" sub menu is "Server preferences". If you click on it, you will find four tabs to be configured. In "General" tabs you can select the preferred user interface language; and logging also can be set. You can define the path to log directory, the maximum log file size and the number of rotated files (Figure 5).
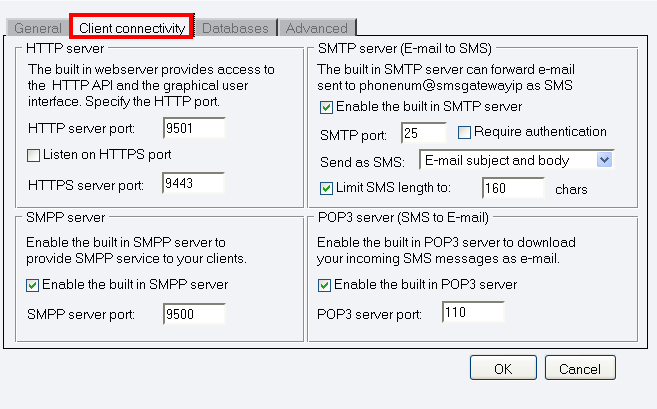
At "Client connectivity" tab you can enable the built-in servers of Ozeki NG SMS Gateway (Figure 6).
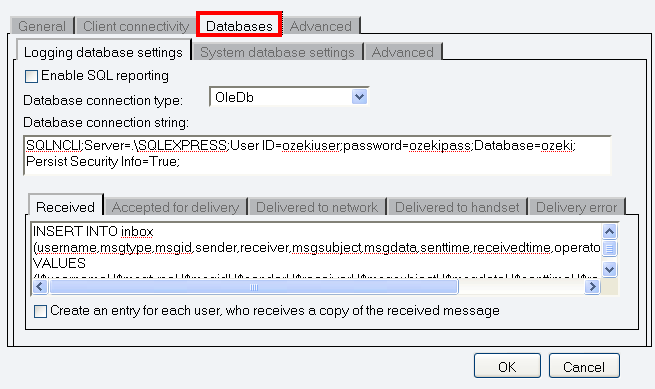
At "Databases" tab you can select the database connection type and you can provide the database connection string (Figure 7).
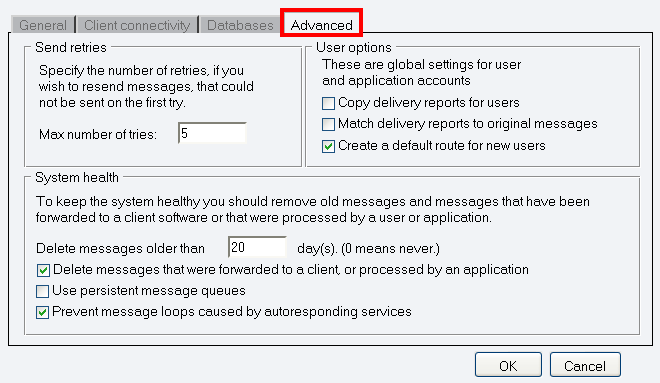
At "Advanced" tab you can configure the maximum number of retries of your messages that are not sent on the first time. In "User options" you will find the global settings for user and application accounts. Finally, "System health" option makes it possible to keep the system "healthy". It means that older messages need to be deleted to give place for new ones. Here you can specify which messages should be removed (Figure 8).
In "Edit" menu two sub menus are left. The first one is "Reporting" function. In order to use this feature, you must configure SQL Logging on the server preferences form. For more information please visit SQL logging page. The other menu item is "Sound notification". With this feature of Ozeki NG SMS Gateway you can play wav files or read out text on message delivery events. On this page you can configure this feature by specifying which events to use, the wav file location with full path, and type in the text to read out.
The Service providers menu
The Service providers menu contains the Add service provider item, as well as any service provider connections that have been installed (Figure 9).
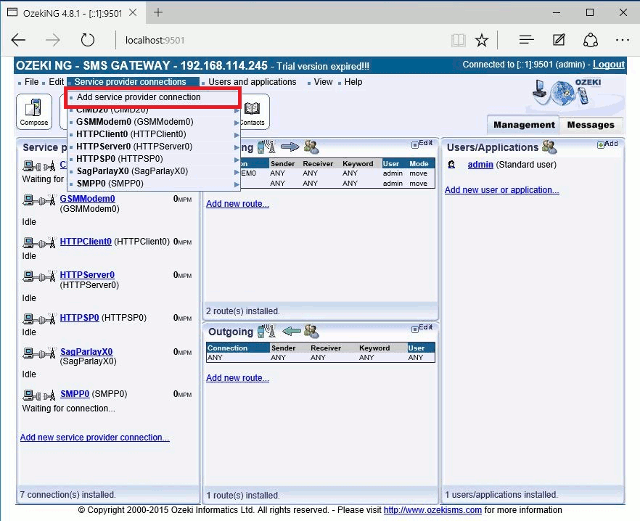
Click Add service provider to open a panel containing
a list of service provider connections you can install.
You can also open this panel by clicking the Add button in the
Service providers panel of the Management Console.
For more information about installing and configuring service provider connections, check out the QuickStart Guide or the Service Provider Connectivity page.
The Users and applications menu
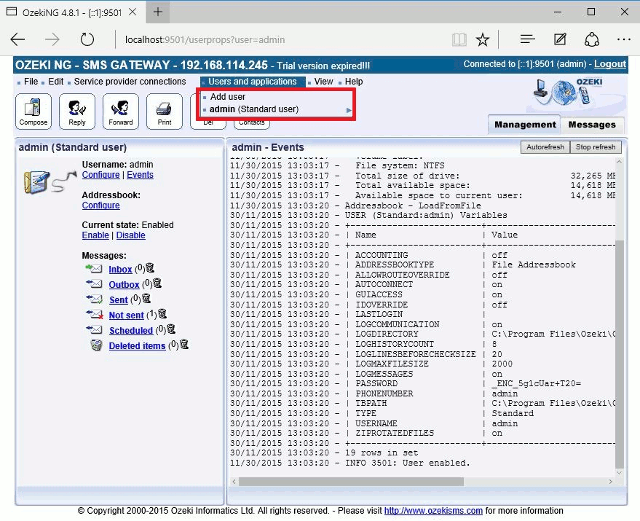
The Users and applications menu contains
the Add user item as well as the users and applications that have been
installed.
Click Add user to open the Add user or application panel.
You can also open this panel by clicking the Add button in the
Users and Applications panel of the Management Console
For more information about installing and configuring users and applications, check out the QuickStart Guide or the Users and Applications page.
If you click any of the users in the menu, you can open the user's SMS account (Figure 10).
The View menu
The View menu contains the following items: Messages, Management console, Server load, User queue overview, Delivery report registry and Server events (Figure 11).

Clicking the Management console item will result in the
same as clicking the Management console tab: you will get back to the
starting screen.
Clicking Server events will open a panel containing the
logging of the latest server events.
The Help menu
The Help menu consists of the following items: On-line documentation, Error codes, Registration and About (Figure 12).

If you select the On-line documentation item,
you will open the starting page of the official website of the software product.
You can consult it for a wide range of information, including an online manual.
Error codes: you can find the possible error
codes listed in order to speed up the identification and solution of
problems.
Clicking Registration will take you to a panel for providing
information for the activation of the software after the purchase, before the
first use (Figure 13).
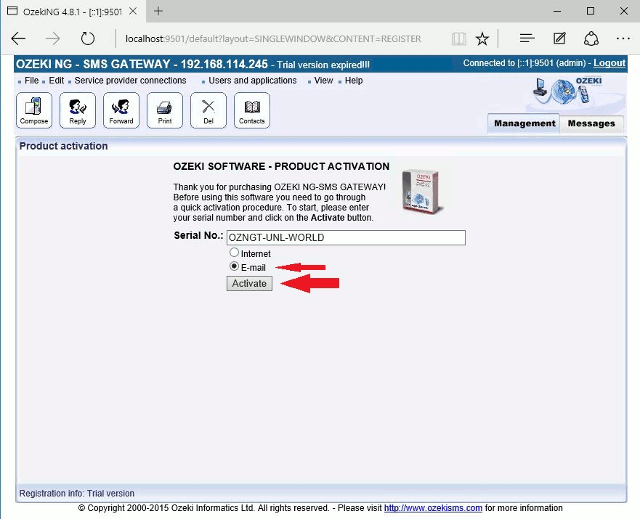
The screen contains the Serial No. field and two radio
buttons: Internet and E-mail.
In the Serial No. field you need to enter the serial number you have
received after the purchase of the product. The radio buttons represent three
options for you to receive the activation code.
If you select Internet, the software will be automatically activated
over the Internet.
If you select E-Mail, you will receive the activation code by e-mail,
at the address you have provided.
If you choose not to have the software automatically activated over the
Internet, you will have to activate it manually. Then you will have to enter
the code you have received by e-mail.
Click the Activate button after selecting one of the activation
options.
Selecting the Help item will take you to a panel providing copyright and contact information related to the software product.
