Users and Applications
This page provides a detailed introduction of how to involve users and applications in SMS messaging using the Ozeki NG - SMS Gateway software. You will be instructed how to install and configure users and applications, how to manage their user accounts, and how to view the logging of server events related to them. The configuration steps will be explained using a Standard user as an example.
To send and receive SMS (Short Message Services) using Ozeki NG - SMS Gateway, you need to install and configure one or more SMS service provider connections and one or more SMS users/ SMS Client and/or SMS applications. To find out more about the role of the software in SMS messaging and how to install and configure service provider connections, check out the Service provider connectivity page.
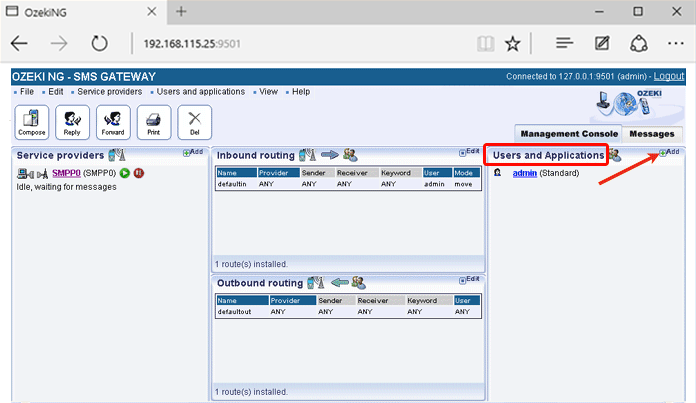
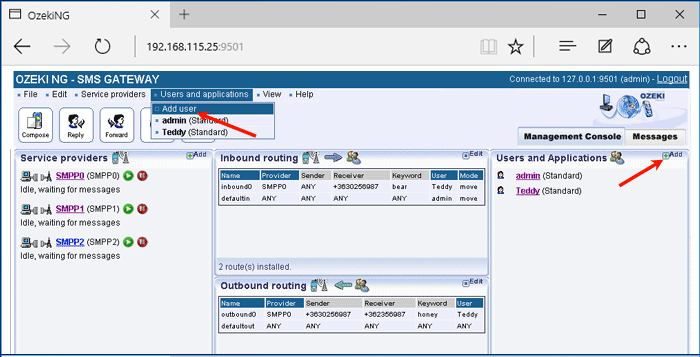
To start installing and configuring a user or application (from now on referred to as user), click the Add button in the top right-hand corner of the Users and Applications panel on the right of the Management Console. You can also add a user by clicking the Add user item in the Users and applications menu (Figure 1).
This will bring up an interface consisting of two panels.
The panel on the left contains a list of users that have been installed.
In the bar at the bottom of the panel you can read how many users have been
installed.
The panel on the right contains a list of users that can be installed.
Each user in the left-hand panel is listed with a unique name
(and the user type stated in brackets).
Each user in the right-hand panel is listed with the name of
its type and a brief description of what it can be used for.
A standard user can use the HTTP user interface to log in to the program. To add a standard user or any other type of user, click the Install link in the respective entry in the list (Figure 2).
When installing a user (type), you need to give it a unique username. Clicking the Install link will bring up the Standard user installation panel. Here, you need to enter a unique username in the Username field.
This will take you to the Configuration panel with
the Authentication tab.
The Username field contains the unique username you have
provided in the previous panel.
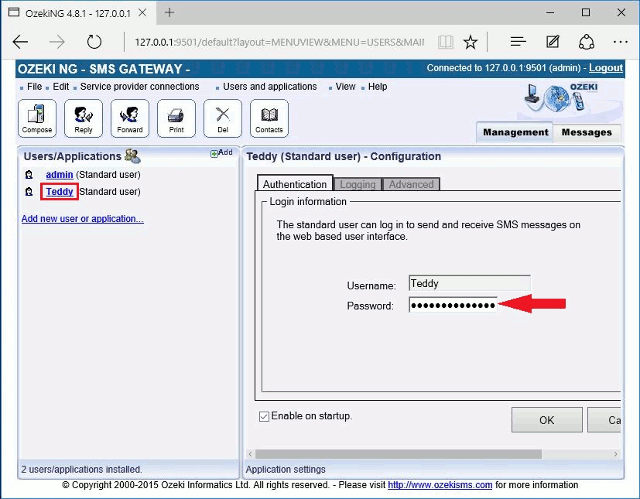
The Password field contains a password offered by the program.
You can and should change it. Your password should be a combination of letters
and digits (at least one or two of the latter). From now on, the username and
password you have provided can be used to log in to the program (Figure 3).
The name of the logged-in user can be read on the right of the title bar of the graphical user interface of Ozeki NG - SMS Gateway. (See Figure 1 on The Menu page.)
To configure logging related to the user, click the
Logging tab in the Configuration panel.
The tab has a Logging and a Log file settings section.
Here, you can choose whether to make the program write log entries about sent
and received messages in human readable format and/or log HTTP communication.
You should check at least the Log sent and received messages in human
readable format checkbox, as logfiles can be useful in debugging
communication problems (Figure 4).
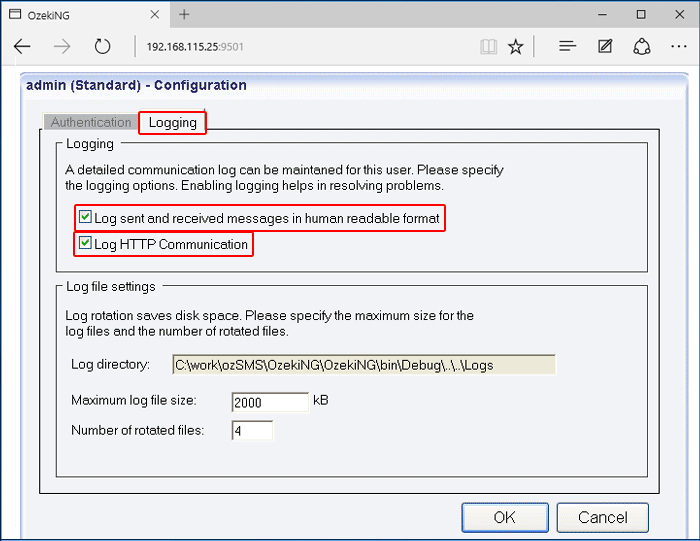
In the Log file settings section of the tab, you can
make specifications for the size and the number of available logfiles.
Log rotation saves disk space, as it ensures that older (and probably no
longer needed)
logfiles will be automatically deleted from the log directory, which is
specified in the
Log directory text box. By default, the access path to the logfiles is:
C:\Program Files\Ozeki\OzekiNG - SMS Gateway\Logs
In the Maximum log file size text box in the Logfile settings section, you can specify the maximum size of a logfile. Once this size is reached, a new logfile will be created. Specify the number of kilobytes for the size of a logfile by entering a positive whole number. By default, the maximum logfile size is 2000 kB.
In the Number of rotated files text box, specify the maximum number of rotated logfiles that are saved. Specify this number by entering a positive whole number. By default, the number of logfiles that are saved is 4 (see Figure 4 above).
If you are content with the default specifications, leave the text boxes unchanged.
To modify the configuration or to view server events related to an installed user, open the panel of the user's account. To do this, click the name of the user in the Users and Applications panel of the Management Console. In the panel of the user's account, click the link of the task you wish to perform (Figure 5).
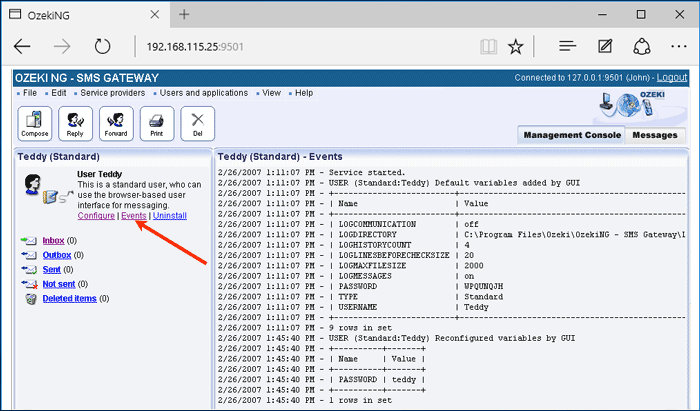
To configure or modify the configuration of a user, click
Configure.
To view the latest server events related to a user, click Events.
To uninstall the user, click the Uninstall link.
You can manage a user's messages by opening one
of the folders in the panel of the user account.
The name of each folder suggests the status of messages it contains.
The Inbox folder contains incoming messages (those that the user
has received).
The Outbox folder contains messages that are waiting to be sent.
The Sent folder contains messages that have been sent
out (those that the SMS Center has accepted for delivery).
The Not sent folder contains messages that have not been sent.
These are messages that the SMS Center has not accepted for delivery or
has not confirmed accepting them within a specified time (for more information,
check out the Basic Configuration Steps section of the
QuickStart Guide).
The Deleted items folder contains messages that have been deleted.
To compose, reply to, forward, print out or delete any messages, open the respective folder and use the toolbar buttons. For more information about how to use them with selected messages, check out The Toolbar page.
FAQs
What applications can SMS messaging be used for?
SMS messaging serves a wide range of applications, including:
- Person-to-Person Text Messaging: This is the most common use of SMS. Individuals exchange text messages directly with each other using mobile phones. It’s a convenient way to communicate with friends, family, and colleagues.
- Information Provision: SMS can deliver essential information such as weather updates, news headlines, or flight schedules. Users can request specific details by sending a keyword to a designated number (e.g., “WEATHER” to get the local forecast).
- Downloading: SMS can provide links to download content such as ringtones, wallpapers, or mobile apps. Users receive a link via SMS and can access the content by clicking on it.
- Alerts/Notifications: SMS alerts cover various domains: E-mail, Fax, and Voice Message Notifications: Users receive alerts when they have new messages in their inbox. E-Commerce and Credit Card Transaction Alerts: Instant notifications about purchases or account activity. Stock Market Alerts: Real-time updates on stock prices or portfolio changes. Remote System Monitoring: Alerts for system failures, security breaches, or performance issues.
- Two-Way Interactive Text Messaging Applications: SMS enables interactive communication. Users can participate in polls, surveys, contests, or voting by sending specific keywords or numbers.
- SMS Marketing: Businesses use SMS to promote products, services, or special offers. SMS campaigns reach a wide audience and encourage customer engagement.
If I uninstall a user named "AAA", then try to create a new user also named "AAA" the system tells me "AAA" already exists, even if it has been uninstalled. How do I delete these uninstalled users definitively?
When you delete a user in Ozeki NG, the system doesn't immediately erase them permanently. This "soft delete" approach offers some benefits:
- Accidental Deletion Recovery: If a user deletion was unintended, restarting the service (which finalizes the deletion) can be avoided, allowing potential recovery.
- Grace Period for Configuration Changes: This temporary period might be useful if you need to make configuration changes related to the deleted user before the final removal.
Finalizing Deletion: Restarting the Service
To permanently remove the deleted user, you'll need to restart the Ozeki NG service. You can find this service in the Windows Services manager, typically accessible through:Start Menu > Control Panel > Administrative Tools > Services
Locate the "Ozeki NG SMS Gateway" service and choose "Restart" from the options menu. This will complete the deletion process.
In essence, Ozeki NG employs a soft delete approach to provide flexibility and a safety net in case of accidental user removals.Why are changes in the physical configuration files are not reflected in the web Admin interface?
Ozeki NG relies on configuration files to define its behavior. These files are
essential for the service to function properly.
For optimal performance, Ozeki NG reads the configuration files only when the
service starts. This means that any changes you make to these files won't take
effect immediately.
To ensure your configuration changes are implemented, you'll need to restart
the Ozeki NG SMS Gateway service. Here's how to find it:
Start Menu > Control Panel > Administrative Tools > Services
Locate the "Ozeki NG SMS Gateway" service and select "Restart" from the options
menu. This restarts the service and applies your newly configured settings.
