How to provide SMS Service for SMPP clients
If you have Ozeki NG SMS Gateway installed on your server, you can provide SMS service for your applications (or your customers). Your applications can connect to Ozeki NG SMS Gateway over the SMPP protocol. This is possible because Ozeki NG SMS Gateway has a built in SMPP SMSC. In this guide you can read about how you can configure your Ozeki NG SMS Gateway to provide SMPP Service.
1. Introduction
In this example, we configure Ozeki NG SMS gateway to provide SMS service over the SMPP protocol for two SMS Client Applications (User John and User Paul). These applications will connect to the built in SMSC of Ozeki NG SMS Gateway (Figure 1). I assume the Ozeki NG SMS Gateway software was installed on a server that has an IP address of: 192.168.1.1.
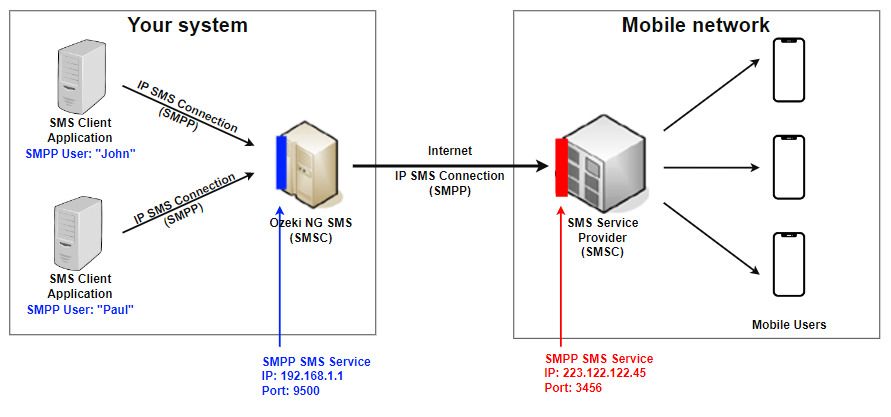
After installation Ozeki NG SMS Gateway will automatically start the build in SMSC on port 9500. This means that the SMPP Client Applications (User John and User Paul) will connect to 192.168.1.1 on port 9500. The SMPP Protocol they will use is SMPP v3.4 and the connection type will be Transceiver.
2. How to setup an SMPP user account for SMPP Client Application (User John)
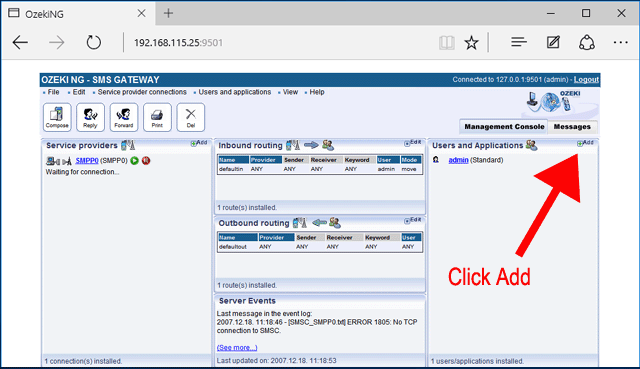
To make it possible for User John to connect to the built in SMSC of the Ozeki NG SMS Gateway, you have to create an SMPP User account. To do this you should click on Add user in the Management console (Figure 2).
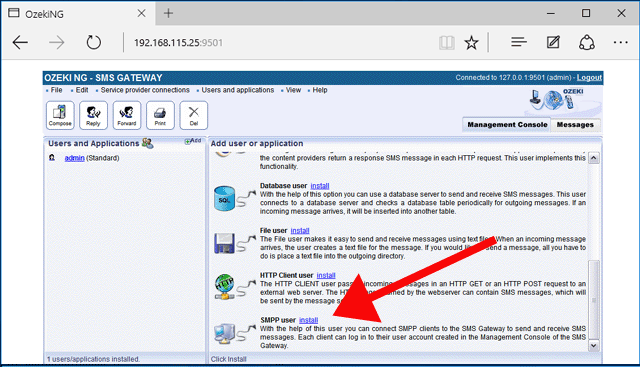
The next step is to select the SMPP User type and click on install (Figure 3).
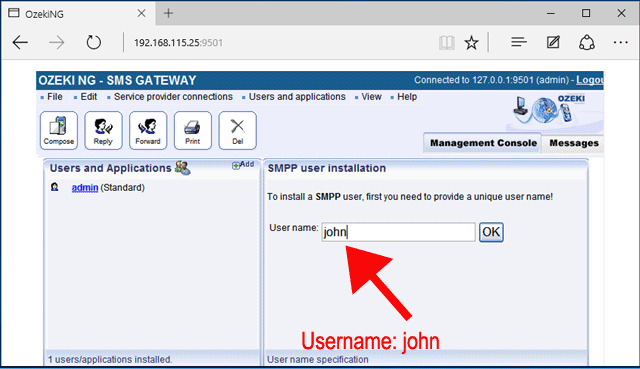
Then you have to provide the username and password. The username should be: john (Figure 4). The password can be wpsd123 (Figure 5).
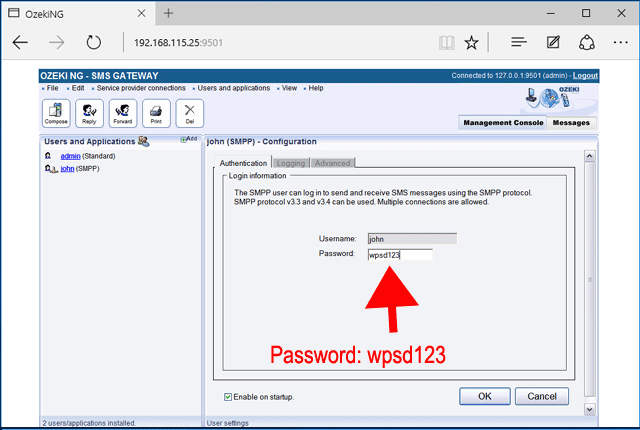
After clicking OK on the SMPP user configuration form, your SMPP user account is successfully created. Following this your SMPP client application can connect to the build in SMSC of your Ozeki NG SMS Gateway using the following connection information. This connection information should be configured in the SMPP Client Application of User John:
SMPP Connection Information for User John:
| SMPP Host: | 192.168.1.1 |
| Port: | 9500 |
| Username: | john |
| Password: | wpsd123 |
| SMPP version: | 3.4 |
| SMPP bind: | transceiver |
| SMPP system type: | SMPP |
More detailed information on how to create accounts for SMPP client connections, can be found in the How to add an SMPP user guide. If you repeat the same steps for the client application user Paul, he will also be able to connect to the built in SMSC over SMPP. For example, if you specify the password wp44sd55 for user Paul, he can connect to your Ozeki NG SMS Gateway using the following parameters:
| SMPP Host: | 192.168.1.1 |
| Port: | 9500 |
| Username: | paul |
| Password: | wp44sd55 |
| SMPP version: | 3.4 |
| SMPP bind: | transceiver |
| SMPP system type: | SMPP |
3. Configuring an SMPP Service Provider connection
Setting up client connections of course, is not enough to get the SMS messages to the wireless network. To make it possible to deliver SMS messages to mobile users, you have to configure an SMS Service Provider connection. You can use IP SMS connections such as SMPP, UCP, CIMD2 to connect to your SMS service provider over the Internet or you can simply attach a GSM modem to your computer with a phone-to-pc data cable to send and receive the SMS messages. In our example (presented on Figure 1.), we attach to the SMS service provider using the SMPP IP SMS protocol. We configure our Ozeki NG SMS Gateway to connect using SMPP to host 223.122.122.45, port 3456.
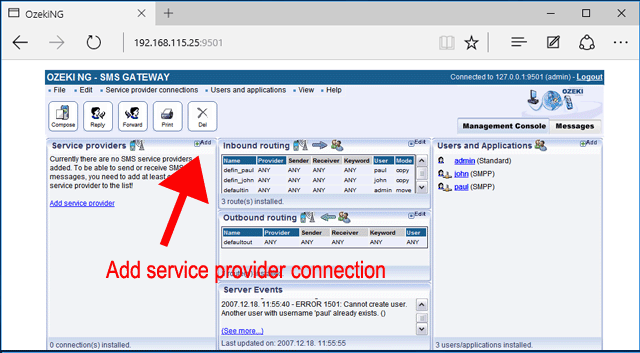
To configure this connection, please add an SMPP service provider connection by clicking on "Add" in the management console (Figure 6).
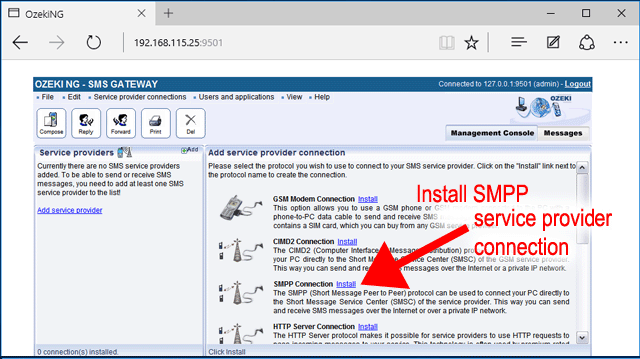
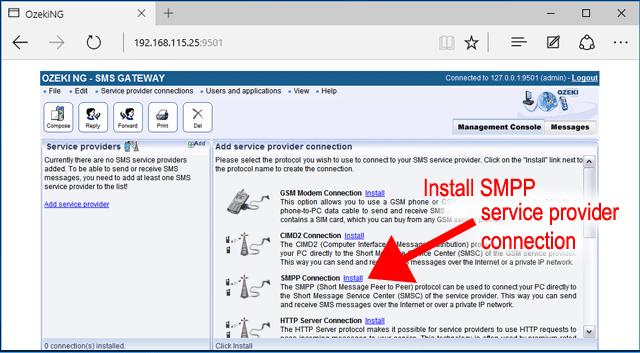
From the list, you have to select the SMPP Connection, then you have to click on install. This will install an SMPP service provider connection (Figure 7).
After you have clicked install, you will be presented with the configuration form of the SMPP service provider configuration. On this form you have to configure the connection details of the SMS Service provider connection. The connection details are provided by the SMS Service provider. For example, if the GSM network operator Vodafone provides you the SMS Service, they will give you a data sheet with the following information:
Connection details provided by your SMS Service provider (e.g.: Vodafone):
| SMPP Host: | 223.122.122.45 |
| Port: | 3456 |
| Username: | accnt |
| Password: | ER32wp |
You receive the information presented in above table when you sign up for their service. This information can be entered on the SMPP Service provider configuration form (Figure 8).
After the configuration details are entered, you can click connect to start the service. That's all you have to do.
4. More information
With Ozeki NG SMS Gateway you can add more than one service provider connection. If more than one connection is available you can use inbound SMS routing and outbound SMS routing to adjust the system according to your needs. You may also want to keep track of all the SMS Messages sent or received for accounting purposes. If this is a requirement, you can configure SQL logging to save a record of all outgoing and incoming messages into a database.
FAQs
What is an SMSC?
An SMSC (Short Message Service Centre) is a crucial network element within
the mobile telephone network. Its primary function is to deliver SMS messages.
Let’s delve into more detail:
- SMS Operations: An SMSC handles SMS-related operations for a wireless network or an SMS service provider.
- Message Forwarding: When an SMS message is sent from a mobile phone or a computer, it first reaches an SMSC. The SMSC then forwards the message toward its intended destination.
- Message Storage: If the recipient of an SMS message is unavailable (e.g., when their mobile phone is switched off), the SMSC stores the message for a specified period (usually up to one week).
- Regulation: The SMSC regulates the process of SMS delivery.
- Billing Support: Additionally, it provides billing support for carriers.
o use SMS messaging with your mobile phone, you need to know the address of your wireless network operator’s SMSC. The SMSC address is usually an ordinary phone number in international format. Mobile phones often have a menu option to configure the SMSC address. Typically, the SMSC address comes pre-set in the SIM card by the wireless network operator, so no manual changes are necessary. You can find a list of SMSC numbers in Appendix G - SMSC settings.
Can I operate my own SMSC?
Yes, you can.
Setting up an SMSC requires a computer connected to the mobile network, along with suitable software to enable SMSC functionality. Private SMSCs are typically utilized by third-party SMS service providers. These providers establish a connection to the mobile network through various protocols such as SMPP, UCP, or CIMD2, and offer SMS services to their clients through diverse SMS APIs. For instance, the Ozeki NG SMS Gateway can function as an SMSC, facilitating SMS services via protocols like SMPP, as well as offering support for HTTP SMS API, C# SMS API, PHP SMS, and more to clients over the Internet.
Do I have to pay for SMS messages if I operate my own SMSC?
Yes.
If you operate your own SMSC (Short Message Service Centre), there are costs
associated with sending SMS messages. Here’s how it works:
Costs for SMS Messages:
When an SMS message is routed from your SMSC to the mobile network, there is a cost.
You’ll pay this cost on a per-message basis either to the mobile network operator or to the SMS service provider that facilitates your connection to the mobile network.
Connecting to the Mobile Network:
To send SMS messages to mobile phones from your SMSC, you need a way to connect to the mobile network.
This connection requires signing up for the services of a mobile network operator or an SMS service provider.
Can I become an SMPP service provider?
The good news is that, yes, you can leverage Ozeki NG SMS Gateway to offer an SMPP service! Here's how:
Ozeki NG boasts a built-in SMPP server, essentially transforming your software into a hub for SMPP communication. This allows you to:
- Create SMPP User Accounts: Define user accounts with usernames and passwords for external applications or services that will interact with your SMPP server.
- Empower Others with SMPP Access: By granting access through these user accounts, you can enable other entities to send and receive SMS messages using the SMPP protocol. This essentially allows you to provide an SMPP service to them.
In essence, Ozeki NG SMS Gateway empowers you to become an SMPP service provider, facilitating SMS communication for other applications and services through the versatile SMPP protocol.
Which SMPP version is the most common?
SMPP v3.3 and SMPP v3.4.
The Short Message Peer-to-Peer (SMPP) protocol, the backbone of SMS communication, comes in different flavours. Version 3.3 is the most widely used and ensures compatibility across different systems. Version 3.4 adds a convenient feature: a single connection can handle both sending and receiving messages, simplifying communication setup. SMPP also offers two ways for data exchange. Synchronous communication acts cautiously, with each participant waiting for confirmation before sending the next message. Asynchronous communication allows for faster exchange by sending multiple messages at once, with acknowledgements coming back later, potentially in a different order. While the latest version is SMPP v5.0, it's not as commonly used. When setting up an SMPP connection, it's always best to check which version your SMS service provider supports to ensure smooth communication.
What is SIM hosting and how is it related to SMPP?
SIM hosting offers a convenient solution for businesses or individuals requiring a dedicated phone number for SMS communication but lacking the resources to manage their own SIM cards and modems. Here's how it works:
- The Provider's Network: SIM hosting service providers maintain a large pool of GSM modems, each equipped with a unique SIM card and phone number.
- Incoming Message Routing: When someone sends an SMS message to one of these phone numbers, the message is received by the provider's modem.
- SMPP Forwarding: The SIM hosting service leverages the SMPP protocol to efficiently forward these incoming messages to their customers.
- Customer Integration: Customers can utilize software like Ozeki NG SMS Gateway to connect to the SIM hosting provider by configuring an SMPP link. This link establishes a communication channel for receiving forwarded messages.
Can I become a SIM hosting provider?
Yes! Ozeki NG SMS Gateway empowers you to create a SIM hosting service, offering dedicated phone numbers and message delivery for your customers.
Building Your Infrastructure:
- GSM Modems: Assemble a set of GSM modems and connect them to your Ozeki NG installation.
- SIM Card Activation: Equip each modem with a unique SIM card, providing a pool of phone numbers for your service.
Enabling Communication:
- SMPP Connectivity: Configure SMPP user accounts within Ozeki NG. These accounts will act as access points for your customers to connect to your SIM hosting service.
- Routing Configuration: Set up inbound and outbound routing rules to ensure messages are delivered to the correct phone numbers (modems) associated with your customers.
The Ozeki NG Advantage:
By leveraging the capabilities of Ozeki NG, you can manage a comprehensive SIM
hosting service. Customers can connect through SMPP, send and receive SMS messages
through your network of modems, and enjoy the benefits of dedicated phone numbers.
In essence, Ozeki NG provides the foundation to establish yourself as a reliable
SMS service provider, offering SIM hosting solutions to your customers.
Can I define a unique service type parameter for each message?
Ozeki NG SMS Gateway offers flexibility when it comes to message delivery. You can define a custom service type for each SMS you send, allowing for further categorization or tracking.
Enabling Custom Service Types:
- Database Integration: If you're using an SQL to SMS gateway configuration, modify your database structure. Add a new column named "servicetype" (data type: varchar) to the "ozekimessageout" table. This column will store the custom service type value for each message.
- Submitting Messages: When submitting an SMS message, ensure you include the desired service type value within the "servicetype" field of the corresponding database entry.
Ozeki NG Configuration:
To ensure this custom service type gets transmitted along with the SMS message, you'll need to modify the SQL statement within Ozeki NG. Follow these steps:
- Access Database User Configuration: Locate the "Database user configuration form" within Ozeki NG.
- Modify SQL Select Statement: Navigate to the "SQL for sending" tab and modify the existing SQL statement. Change the original statement:
- SELECT id,sender,receiver,msg,msgtype,operator FROM ozekimessageout WHERE status='send' to this updated version:
- SELECT id,sender,receiver,msg,msgtype,operator,servicetype FROM ozekimessageout WHERE status='send'
Hexadecimal Format:
It's important to specify the service type value in hexadecimal format within the database. For example, to represent a service type of "7777," you would enter "3737373700" (without quotes). This conversion ensures proper interpretation by the system.In essence, by following these steps, you can leverage custom service types to categorize your SMS messages and potentially use this information for further processing or analysis.
Can I see the phone number of sender's service centre?
Unfortunately, in most cases, you cannot directly see the phone number of the sender's service centre when receiving an SMS message.
I have installed and SMPP connection then set the sender address of my admin user, but it does not appear on the destination phone. Could you help me?
It seems like you've set up your sender address in Ozeki NG, but it's not showing up on the recipient's phone. There might be a simple fix!
Double-Checking the Service Provider Settings:
- Go back to the settings for the service provider connection you're using to send messages.
- Look for a section related to the "sender number" or "sender address." This might be labelled as "Telephone number" as well.
- Check if there's a box next to it called "Overridable" or something similar. This option controls whether you can use a different sender address than the default one for that connection.
- If the "Overridable" box isn't checked, click on it to enable it.
Enabling the "Overridable" option allows Ozeki NG to use the sender address you set for your admin user when sending messages through this specific connection. By following these steps, you can hopefully ensure your chosen sender address appears on the recipient's phone when sending messages!
