Android SMS Gateway
When you want to send bulk SMS from your PC, the easiest way is to send the SMS through your Android phone. This article is divided into two parts. The first section is about how to turn your Android mobile phone into an Android SMS gateway. The second section details how to connect your Android Gateway to the Ozeki NG SMS Gateway on Windows PC to send your first message, and verify its delivery. Each part includes a video guide demonstrating the steps, a quick reference of the necessary actions, and a detailed written guide with edited screenshots to highlight key areas.
What is a default SMS handler?
A default SMS handler is the application on a mobile device that is designated to manage all SMS functions by default (e. g. sending, receiving, storing text messages). Changing makes the new app take over these tasks from any other messaging apps on the device, ensuring that all SMS communications are routed through it.
The advantages of using Android SMS Gateway
- Free sending and receiving are included in many SMS subscriptions. In this case, you can send free SMS messages.
- Android phones are the most commonly used.
- Easily connect to your PC to send SMS messages from your desktop.
- You can send unlimited messages
- There are no charges for receiving SMS.
- Secure your privacy with our end-to-end encrypted SMS.
- Keep your SMS messages forever by storing them on your laptop.
Configure Android SMS Client (video guide)
In this quick 30-second tutorial, we will show you how to set up the Ozeki Android SMS Gateway on your Android device. The video will cover how to start the application, grant the required permissions, and set it as the default SMS handler within the Android system. The instructions are straightforward and designed to help you complete the setup process efficiently.

Configure Android SMS Client (brief summary)
- Open Android SMS Client
- Start the service
- Grant permissions
- Change default SMS handler
Configure Android SMS Client (in-depth tutorial)
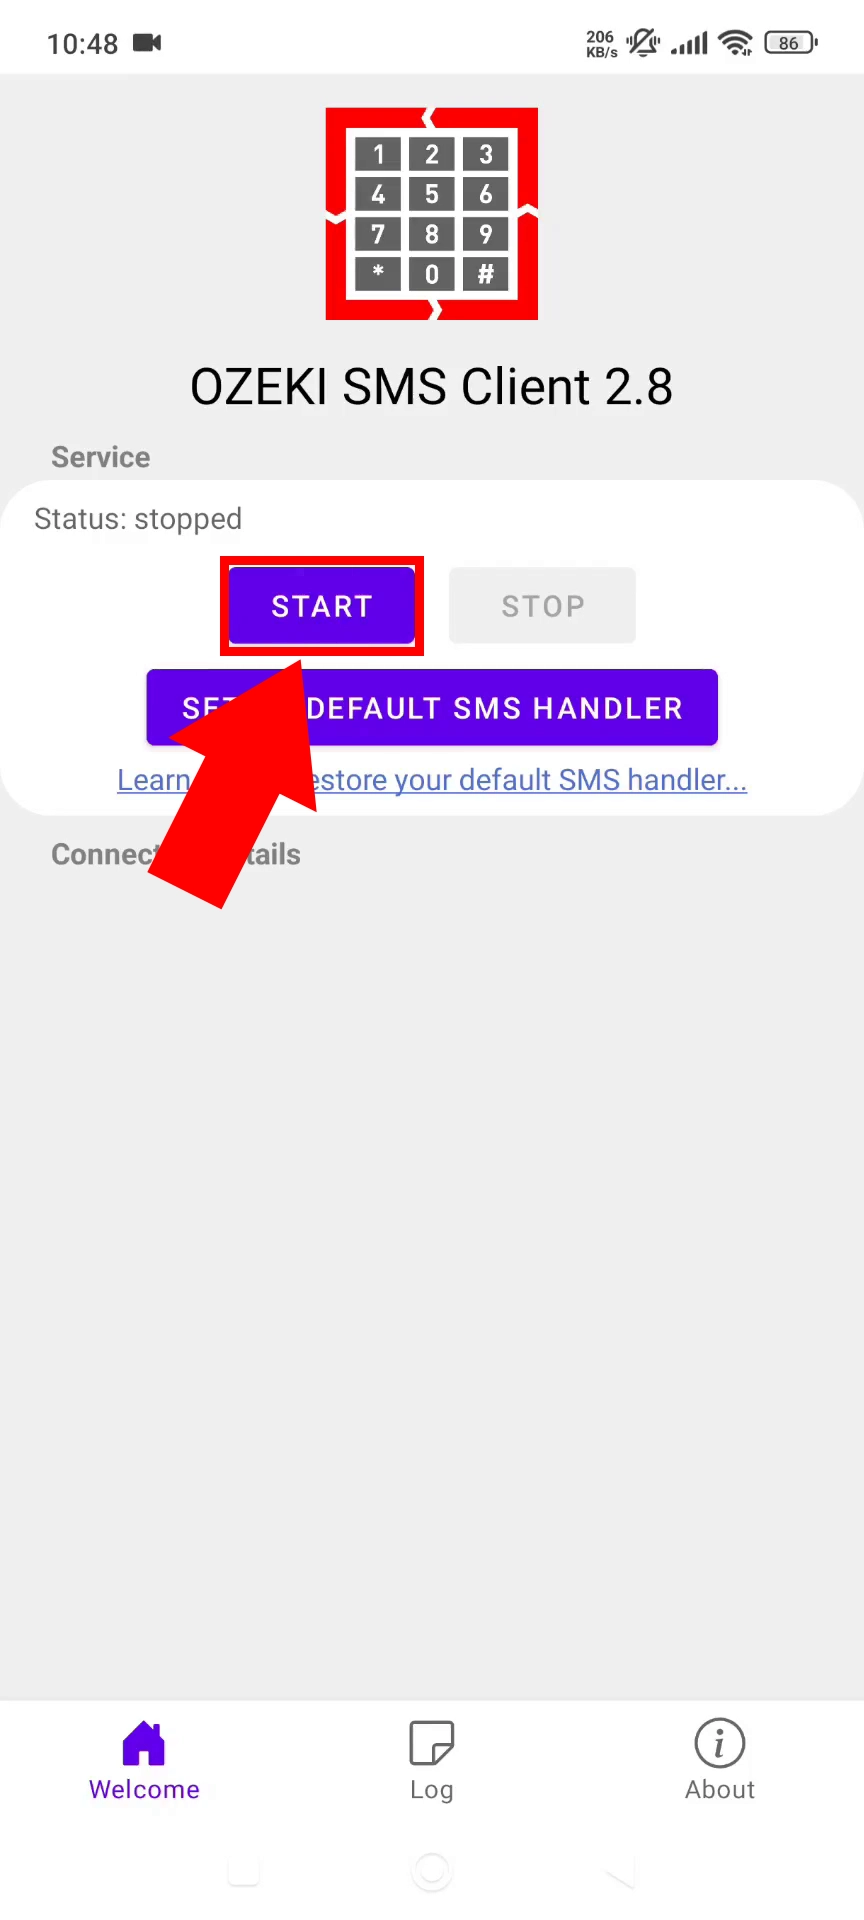
First, after opening the application, tap on the purple Start button, as seen in Figure 1.

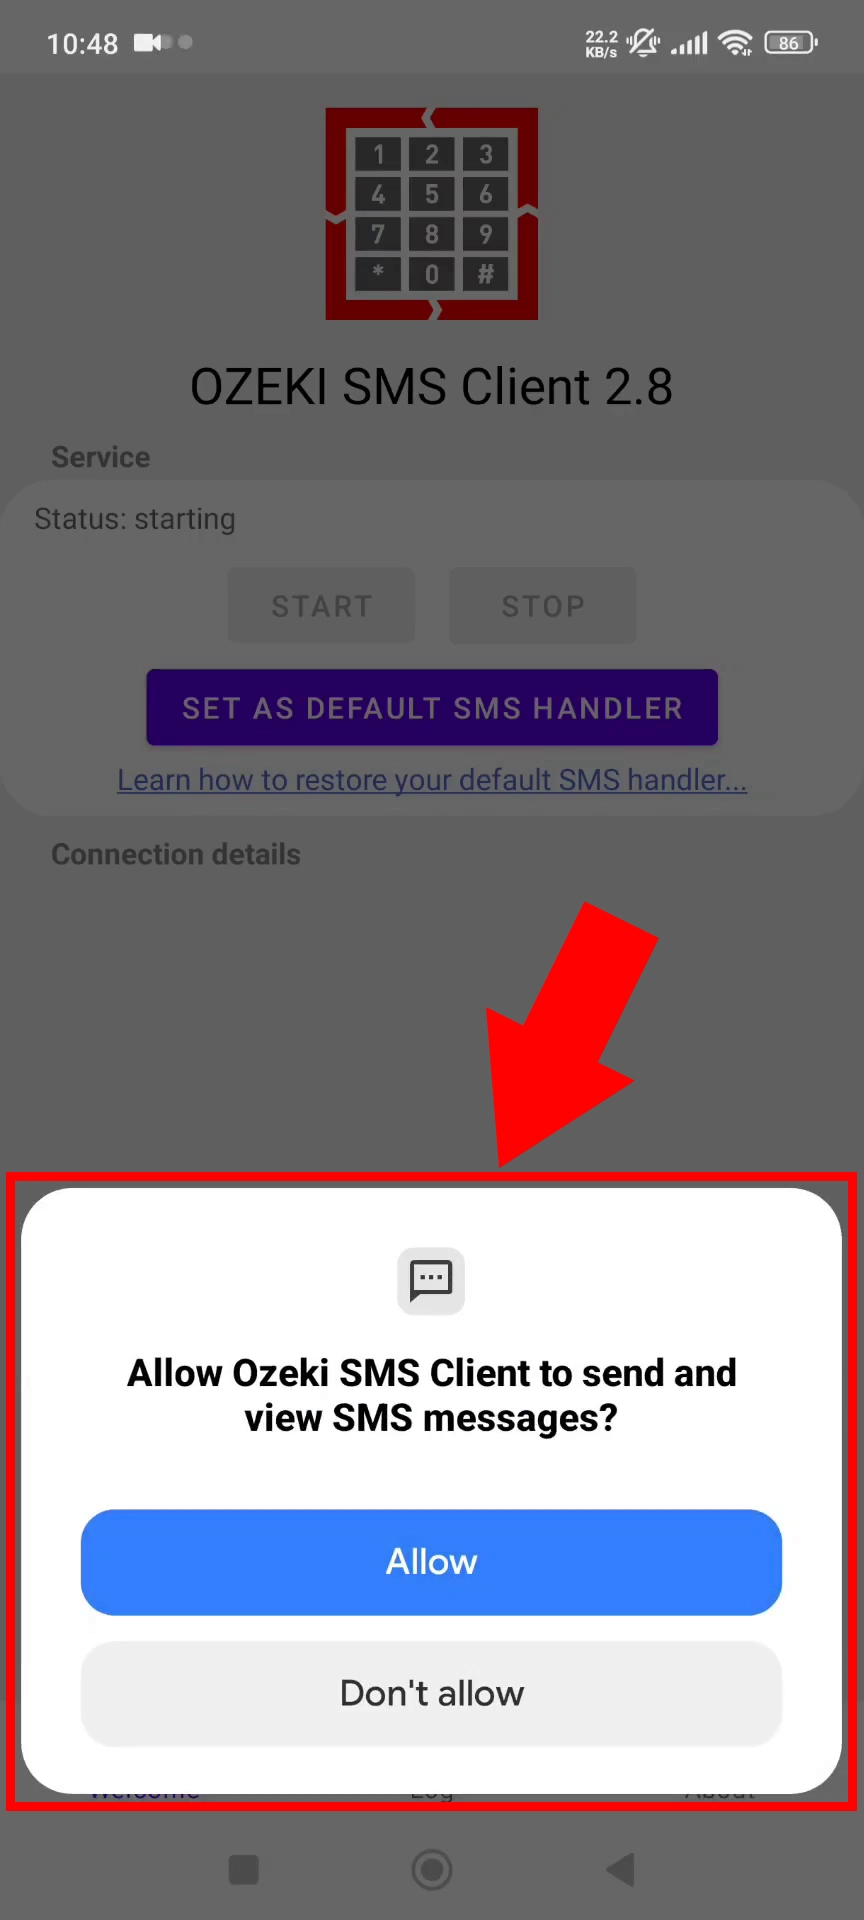
Then grant the application the required permissions, by pressing Allow on the pop-up windows, as can be observed in Figure 2.

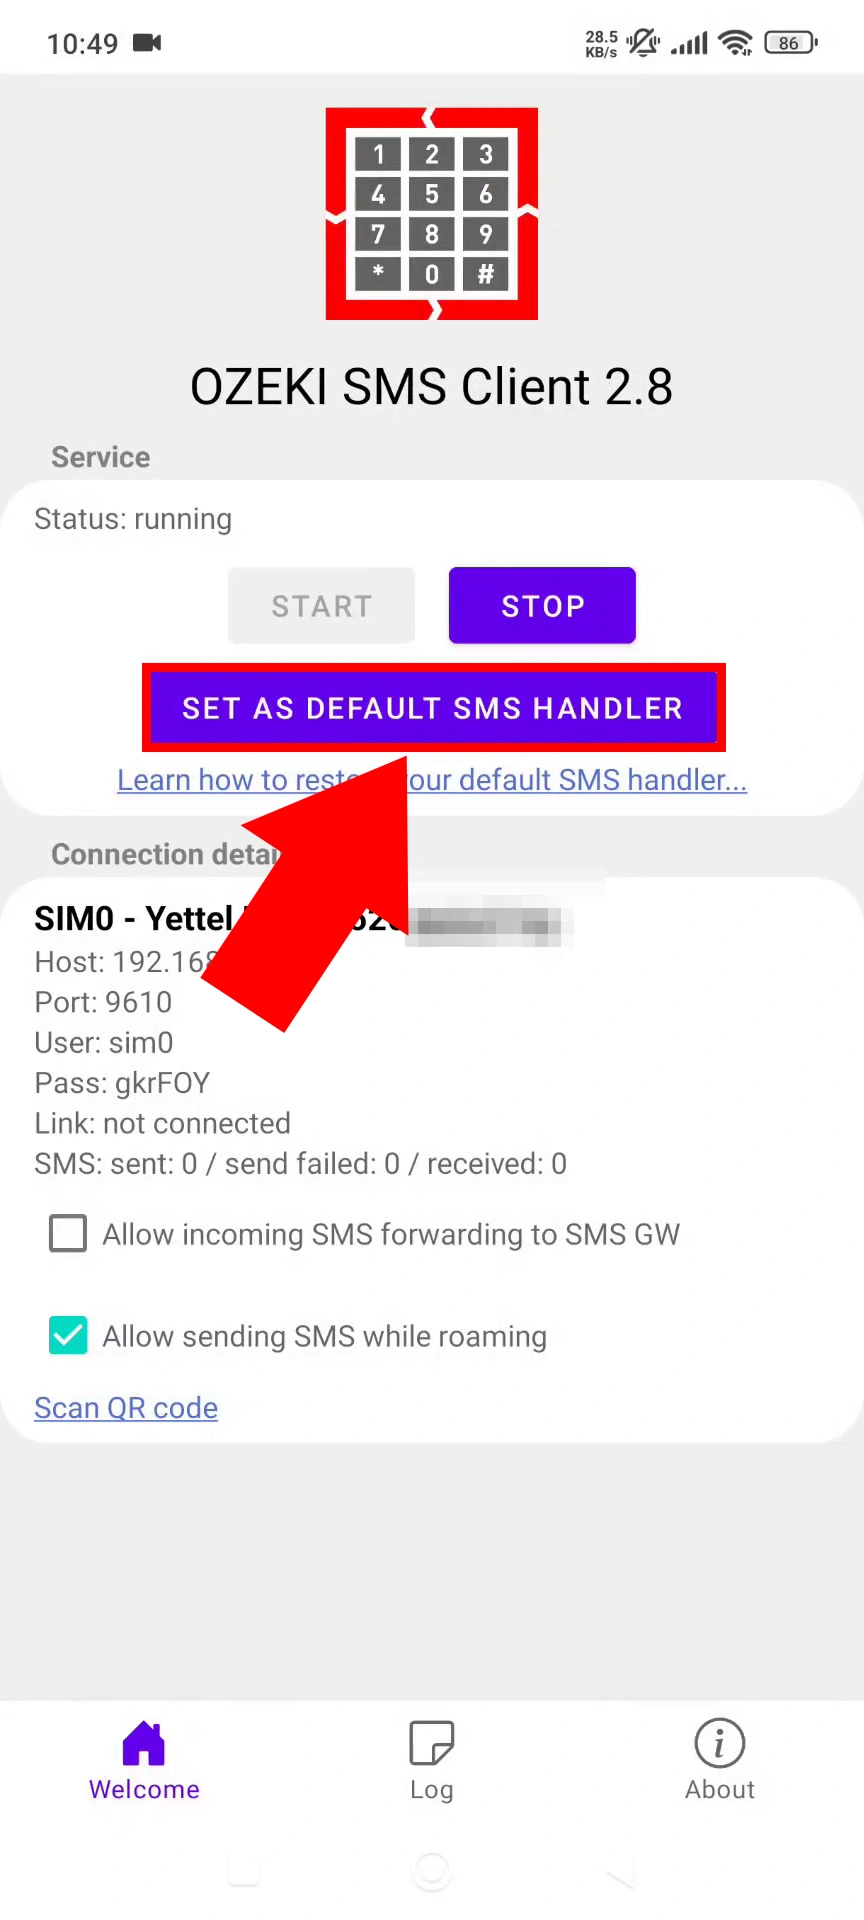
Next, tap the Set as default SMS Handler button, as shown in Figure 3.

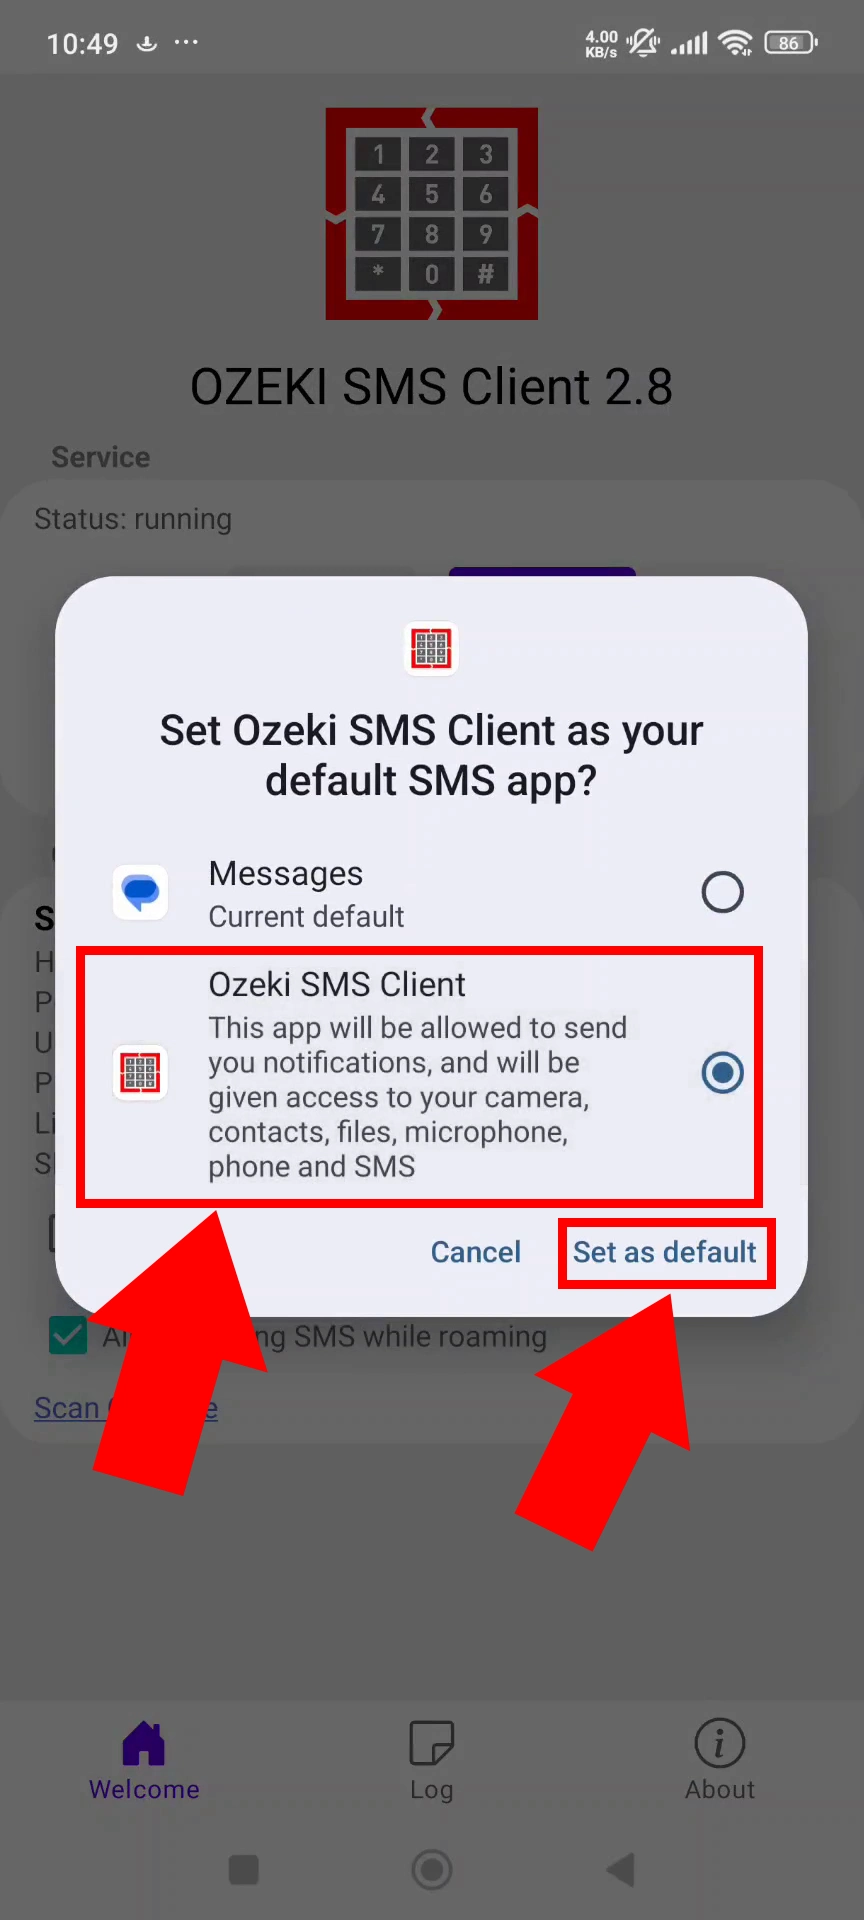
This will open another pop-up window, where you will be prompted to select your default SMS handler app by your Android system. Select Ozeki SMS Client, then tap Set as default, both highlighted in red in Figure 4.

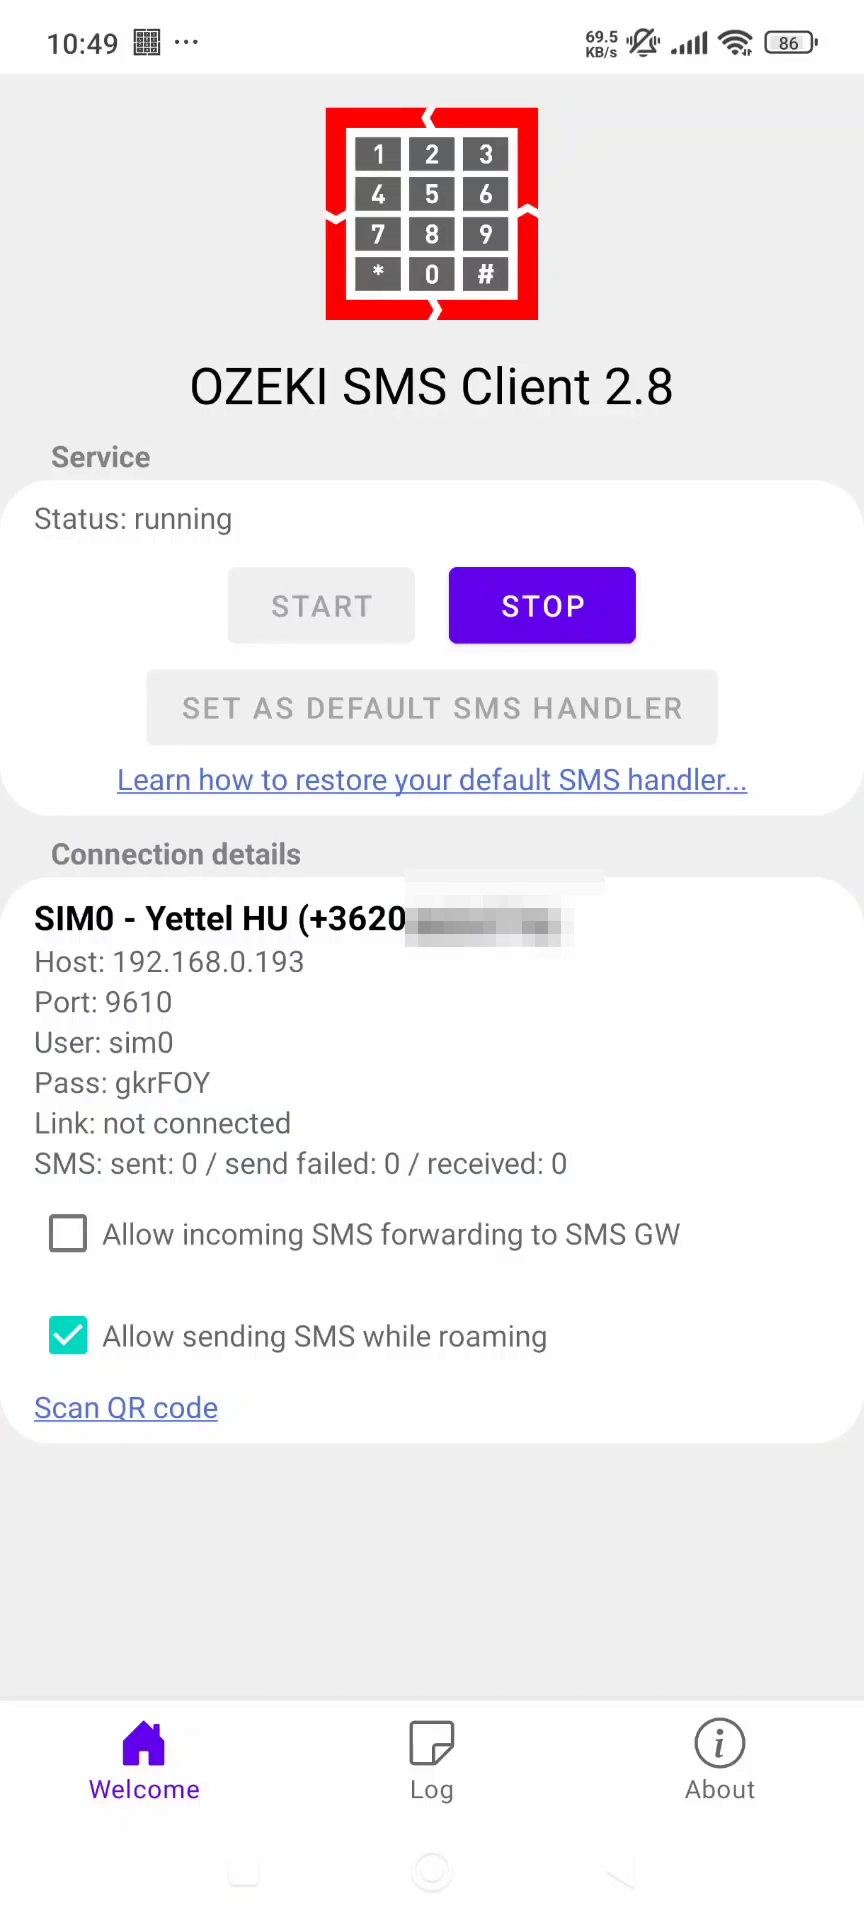
If you have followed along correctly so far, you should see a screen similar to Figure 5.

Configure Ozeki NG SMS Gateway (video instructions)
This tutorial, which runs for 106 seconds, will walk you through the steps to connect the Ozeki SMS Client on your Android device to the Ozeki NG SMS Gateway server on Windows. You will be taught to add a new connection and input the credentials from the Android client. The tutorial also covers sending your first message and verifying its successful delivery, both within the Ozeki NG SMS Gateway and the Ozeki SMS Client. The instructions are straightforward, ensuring a smooth setup process.
Configure Ozeki NG SMS Gateway (TL;DR version)
- Add service provider connection
- Install Android connection
- Enter host, port, user, pass from Android client
- Send first message
- Check if first message has been sent
Configure Ozeki NG SMS Gateway (detailed walkthrough)
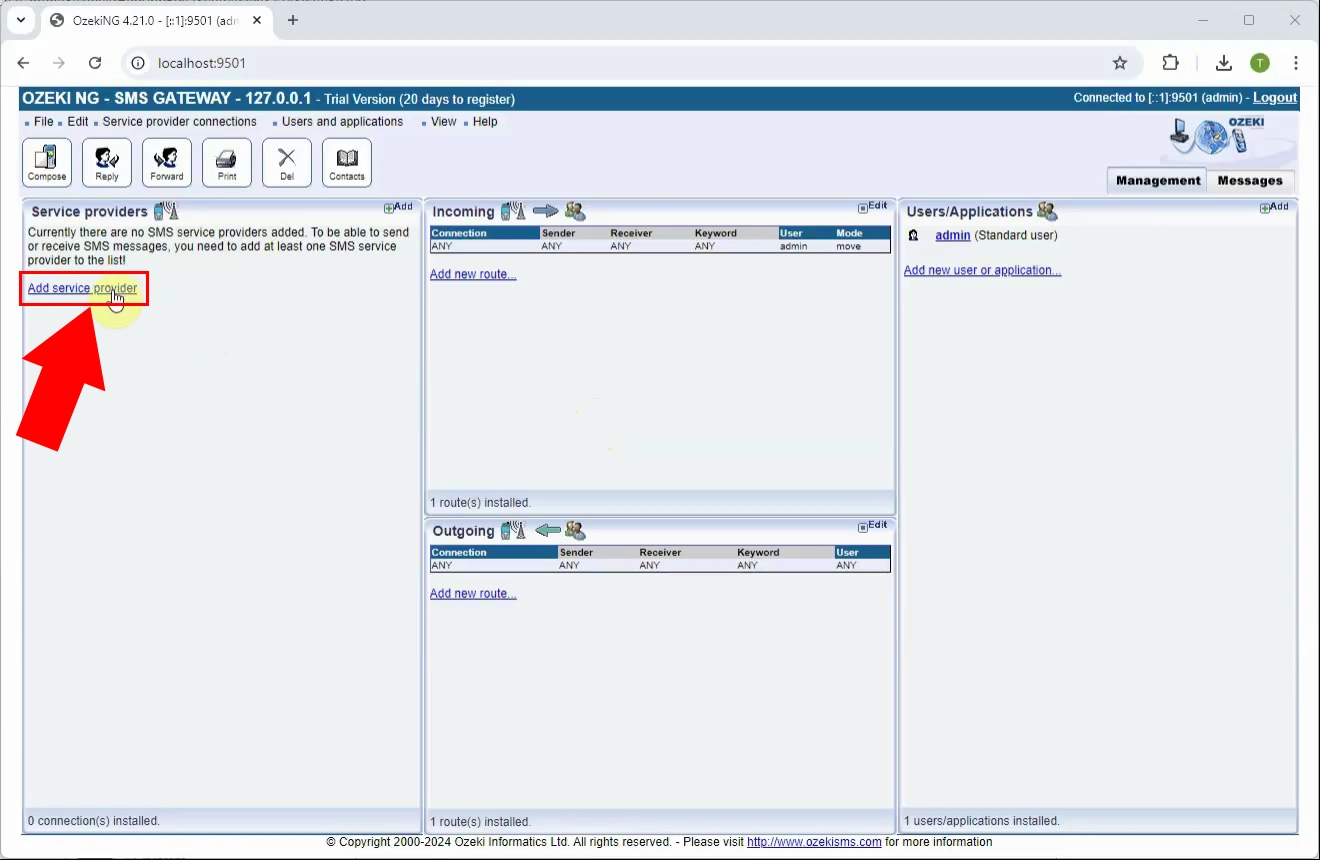
Inside Ozeki NG SMS Gateway, select Add service provider in the left panel, as illustrated by Figure 6.
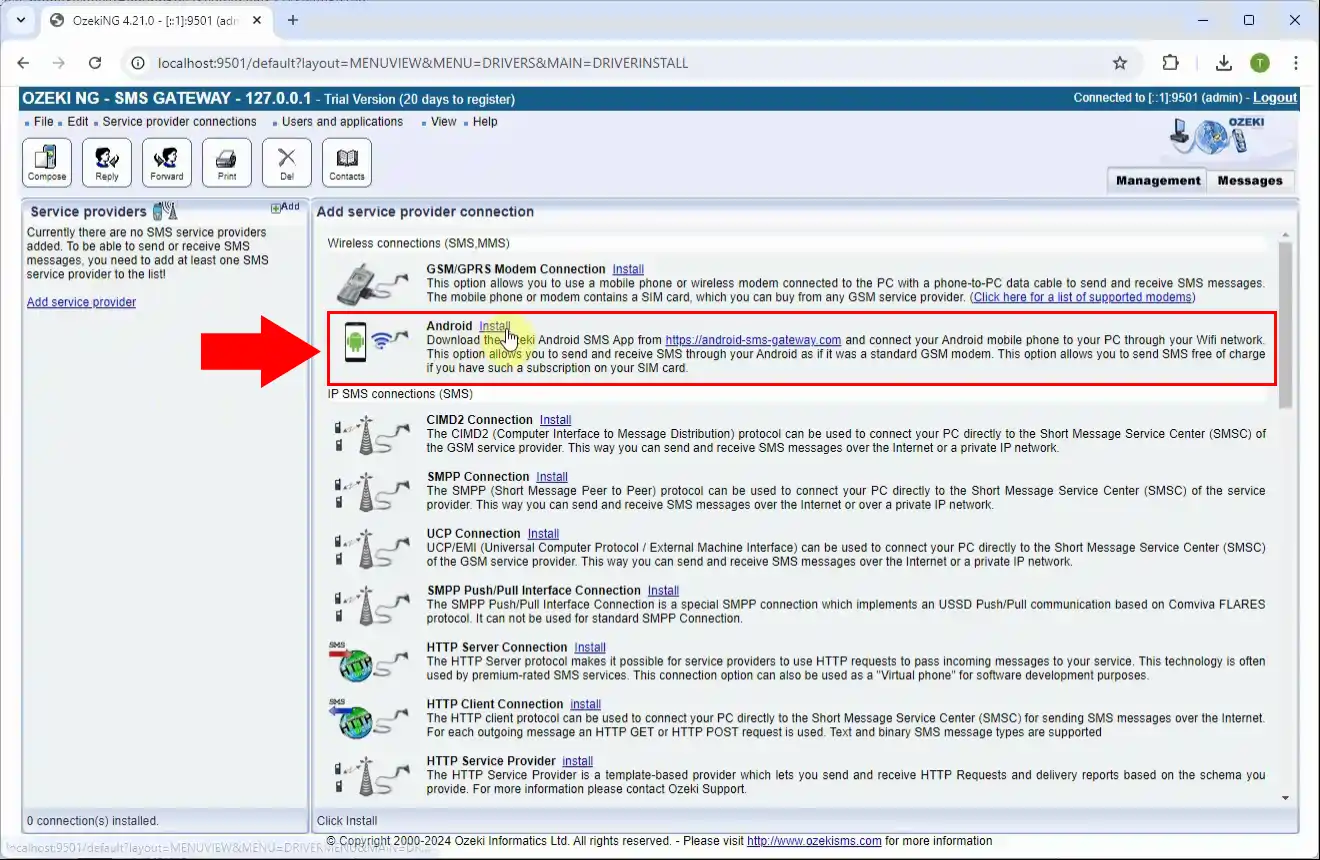
Here, click on Install next to the Android item in the menu (Figure 7).
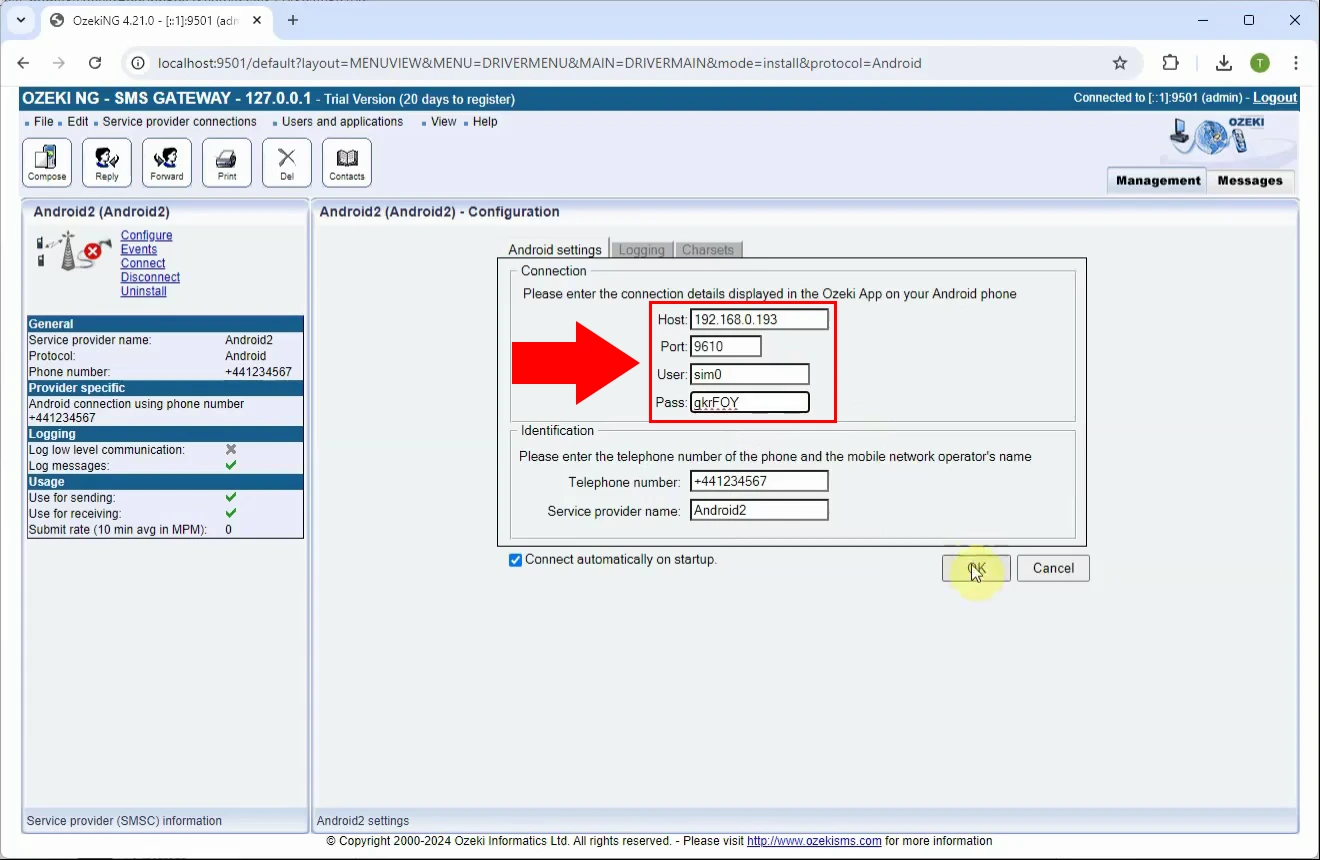
That opens the configuration page for your new connection. Enter the IP address, port, username and password displayed on your Android device to their respective textboxes, as indicated in Figure 8, then hit OK.
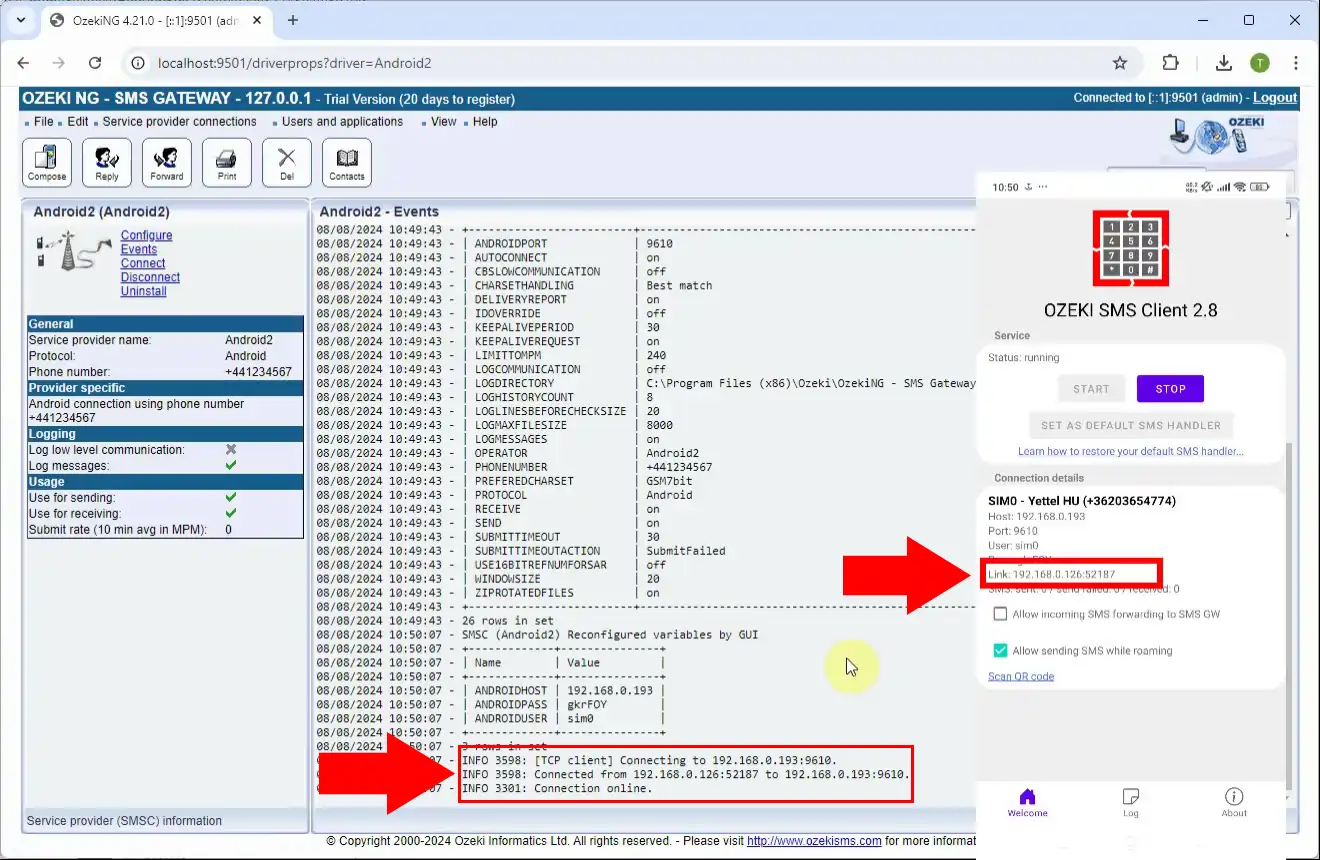
To see if there is a connection, click the Events button located near the top left in the left panel. There, if you have successfully completed the steps so far, you should see logs similar to the ones in Figure 9, telling you the connection is online. Alternatively (or to double check), you can look at the Android app, where after Link it does not say "not connected" anymore, but your IP address and port.
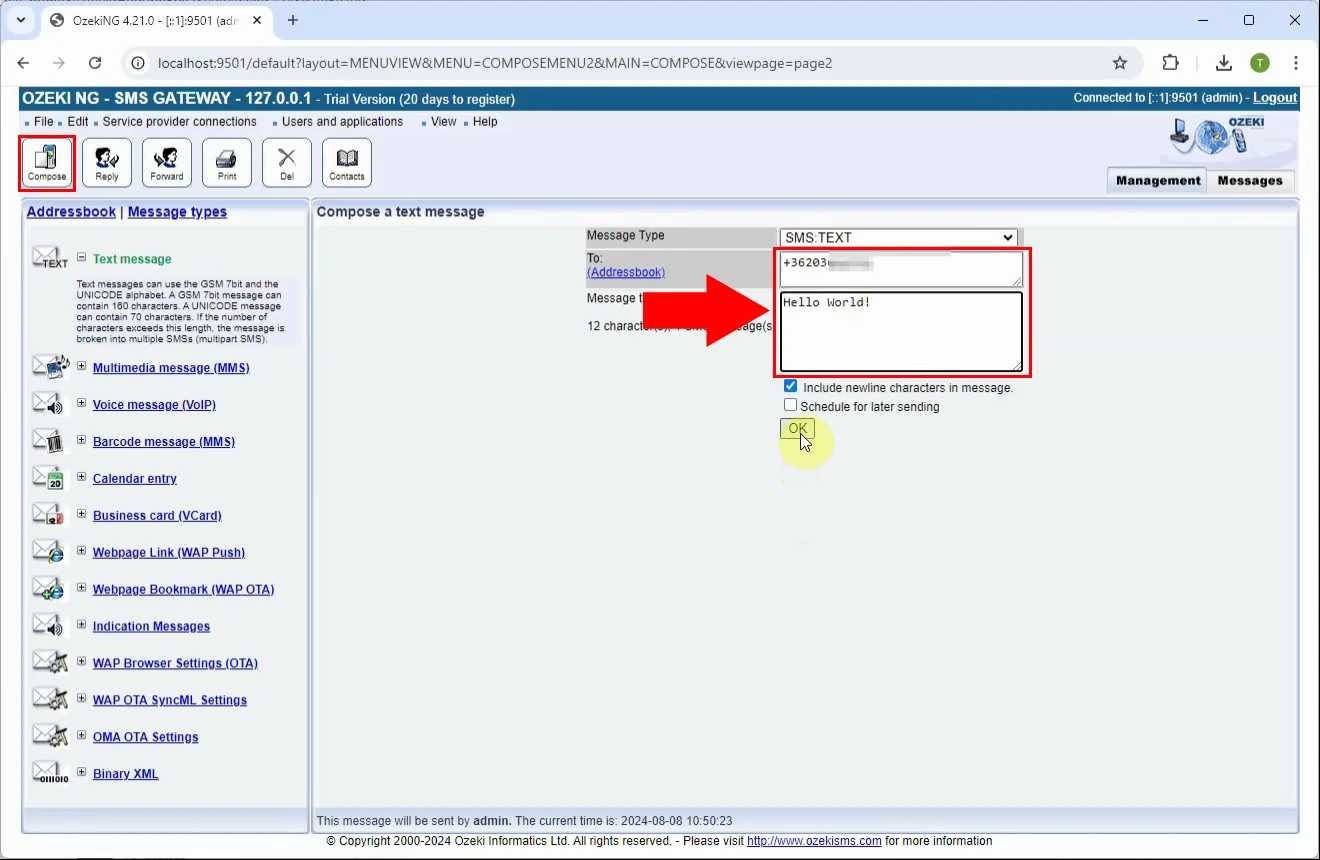
Click on the Compose button located near the top left. Enter the recipient's number and your message to the corresponding fields, then hit OK to send it, as shown in Figure 10.
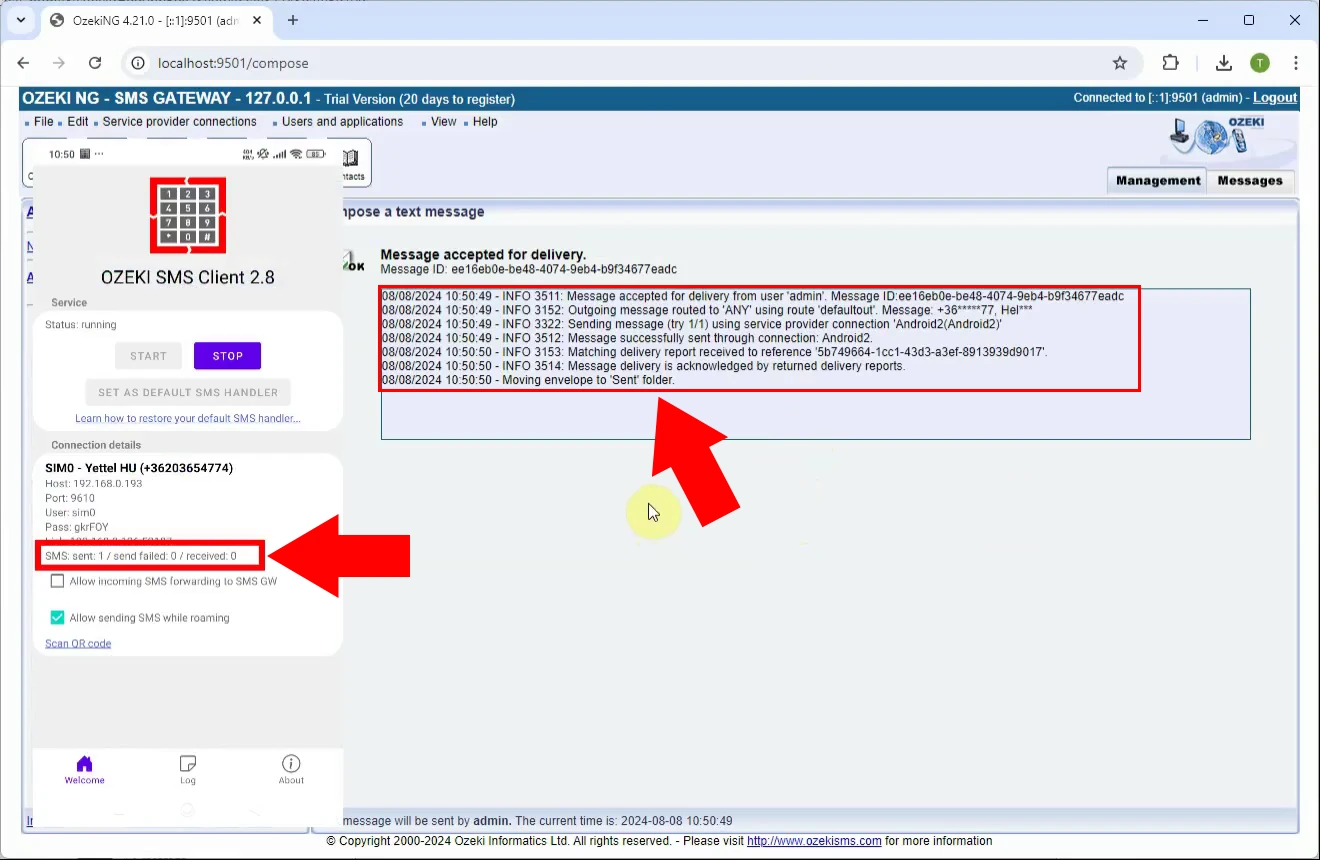
This will open the screen shown in Figure 11, telling you that the message has been sent. The Android app also keeps count of the messages, check to see if the 'sent' counter increased by one.
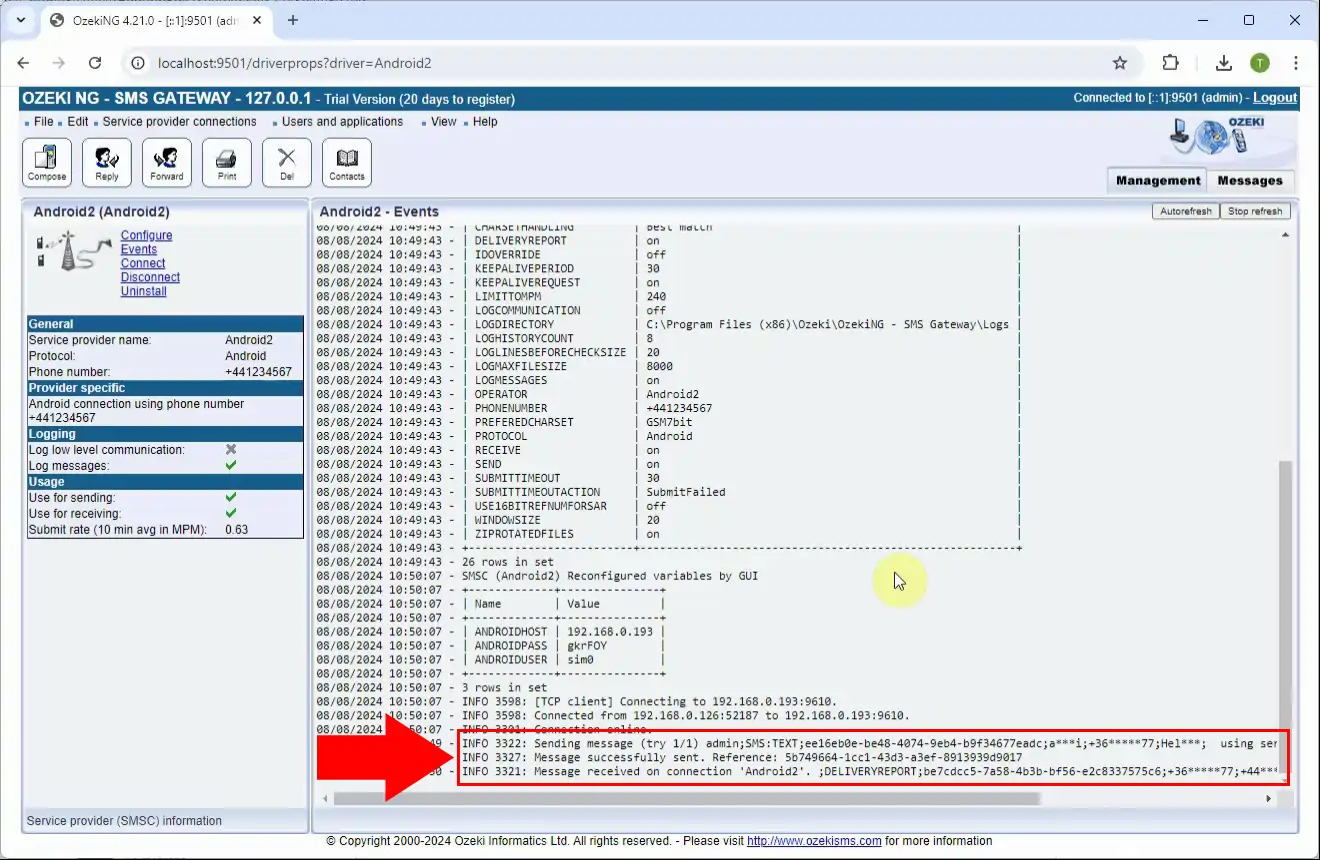
Head back to the Events page to triple check if your message has been sent (Figure 12).
Why should I change my default SMS handler?
Doing so will allow the Ozeki SMS Client to lift the built-in limitations of the Android system (specifically, after a certain number of messages sent out, the user is presented with a pop-up window that prevents more messages from being sent out, unless the OK is pressed by the user manually), ensuring a smoother operation.
Can I revert this change?
Yes, inside the app you will find a link that will take you to this article, showcasing restoring your default SMS handler app (the link is located right below the button you used to change it).
