Send and receive SMS from MS Access
This guide gives you some tips to get you started on sending or receiving SMS messages from Microsoft Access. It gives you the initial installation steps from start all the way to sending your first SMS.
What is Access
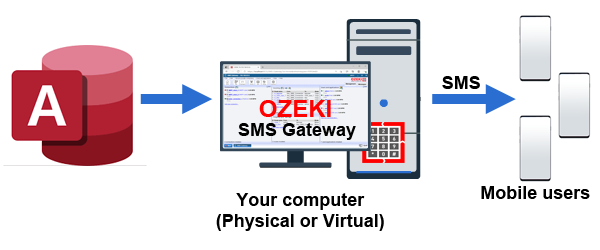
Access is a database management system from Microsoft that combines the relational Microsoft Jet Database Engine with a graphical user interface and software-development tools. Access can be used to manage business data in tables. It is often combined with Ozeki NG SMS Gateway to send and receive SMS.
Introduction
Ozeki NG can connect to an Access database through an ODBC or through an OLEDB connection. It uses two Access tables. One table is used for sending SMS messages the other table is used for receiving SMS messages. The table structures match the table structure used in the MS SQL database configuration. Ozeki NG uses SQL statements to work with these tables through the ODBC (or OLEDB) connection.
Quick instructions to Send SMS from Access
To Send SMS from Access:
- Create the Access database layout
- Open the Ozeki dashboard
- Find the panel named 'Users and applications'
- Click on 'Add new user or application...'
- Find the Database user (Access is a database)
- To Send an SMS from Access install this connection
- Type the text "Access" into the application name field
- Enter the "Access" connection string
- Validate the settings, they must be ok to send sms
- To send your first SMS insert a recording into the ozekimessageout table
- Check the logs to see if your SMS was SELECTED from Access and sent
Video tutorial on how to send SMS from Access
The following video tutorial demonstrates how you can setup an Access SMS solution. It will give you the configuration steps and will show you how this solution can be set up in less than 10 minutes.
Step 1: Create the databaes layout to send SMS
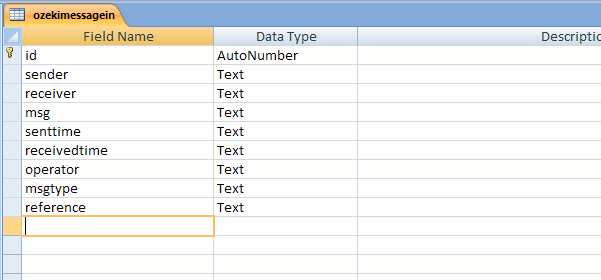
The first step to setup an Access to SMS solution is to create the database table layout. You need to create two database tables: ozekimessageout and ozekimessagein. Ozekimessageout will be used for sending SMS and ozekimessagein can be used for receiving. You may download the already created tables from the following link, or you may create them yourself.
Database tables for sending SMS from Access:
ozeki_database.accdb
Below you can see the table definition of these database tables. The most important fields in these tables are the sender and receiver and the msg field. The sender field contains the sender telephone number, the receiver field contains the recipient telephone number and the msg field contains the messages text.

Step 2: Connect your system to the mobile network
To send SMS messages from access, you need to connect your Ozeki NG SMS Gateway system to the mobile network. You can do this by following the instructions in The quick start guide for sending SMS. After you are able to send and receive SMS messages manually from the Ozeki User interface, you can configure the Access database connection in Ozeki NG SMS Gateway.
Ozeki NG SMS Gateway can be connected the mobile network in quite-a-few ways. The ideal option for your environment depends on the volume of texts you plan to send or receive. For sms volumes up to 10 000 text messages per day, the best option is to use a GSM modem or an Android mobile phone as an SMS gateway. The advantage of this choice is that it often allows you to send unlimited SMS messages free of charge.
For higher SMS volumes you can switch to online SMS services, which means you will send SMS messages over the Internet. When you use on-line SMS service providers you can use a dedicated SMS protocol or an SMS API. There are various SMS protocols out there: SMPP protocol, CIMD2 protocol, UCP/EMI protocol and there are many proprietary protocols based on HTTP. Protocols based on HTTP are called HTTP SMS APIs. The best option to connect to on-line SMS services is to use an SMPP connection. The SMPP protocol is widely used in the SMS industry. It is used by mobile network operators to exchange SMS traffic between each other. SMPP was designed for SMS, and it gives you high performance, instant access to submit and delivery reports and precise time stamps related to SMS delivery. So, choose SMPP if possible.
If you decide to connect to an on-line SMS service provider, it is a good idea to use the HTTP sms client implementation of Ozeki NG SMS Gateway, or the Ozeki REST SMS API client. It is very important not to implement a proprietary HTTP API of a single SMS service provider, because you will be locked into their service. You will also miss the option of creating wireless backup routes and the ability to use great testing tools. It is much more sensible, to implement an API provided by Ozeki NG SMS Gateway because it will give you the freedom to switch providers if costs are raised, or you wish to reach other networks. With Ozeki NG SMS Gateway you can connect to multiple SMS services at the same time.
Step 3: Connect Ozeki NG to your Access database
To send SMS from access, you need to connect Ozeki NG to your Access database tables. To do this you need to setup a database connection in Ozeki NG that points to the Access file. To start, go to "Add new user" in the main menu, and select the database option. (Figure 3).
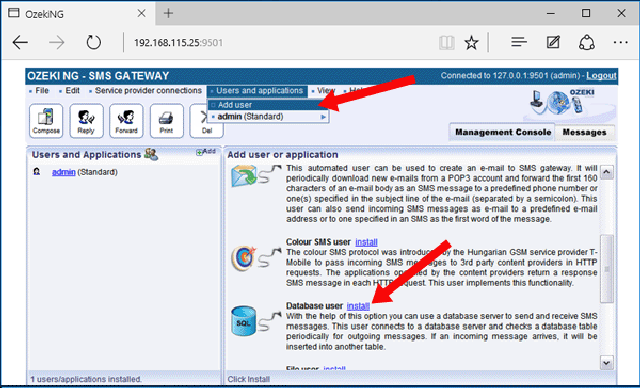
After the database connection has been selected, please pick a unique name for this connection. For your first application, you can pick Access1. If you will add a second Access database later, it can be named Access2.
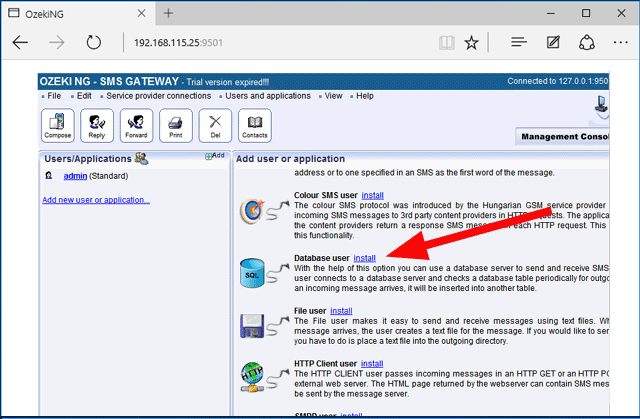
The next step is to provide a unique name for this connection. In our example we provide "Access1" as the name for the connection (Figure 2).
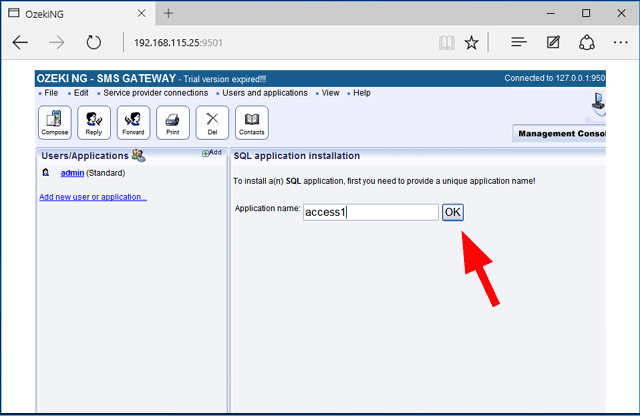
Once this is done you are ready to configure the connection parameters.
To connect your SMS gateway to Access, please select ODBC as the connection method and provide the connection string that points to your database (Figure 3).
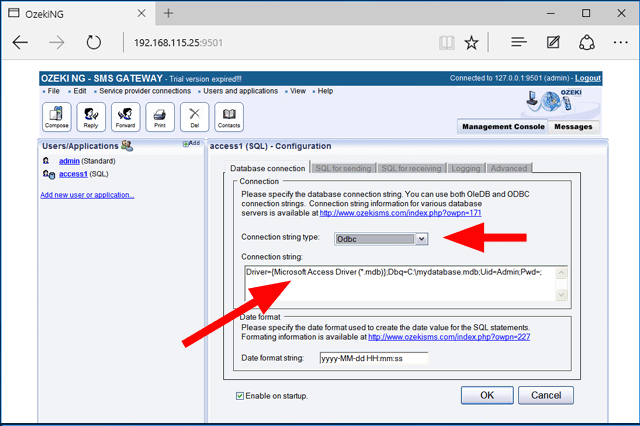
The above connection string specifies a connection string with standard security. The connection string points to your access database (*.mdb) and it contains the username and password. These values must be set to match your system. You can use the following connection strings depending on your requirements:
Standard security:| Driver={Microsoft Access Driver (*.mdb)};Dbq=C:\mydatabase.mdb;Uid=Admin;Pwd=; |
| Driver={Microsoft Access Driver (*.mdb)};Dbq=C:\mydatabase.mdb;SystemDB=C:\mydatabase.mdw; |
| Driver={Microsoft Access Driver (*.mdb)};Dbq=C:\mydatabase.mdb;Exclusive=1;Uid=admin;Pwd=; |
To enable certain pragmatically admin functions such as CREATE USER, CREATE GROUP, ADD USER, GRANT, REVOKE and DEFAULTS (when making CREATE TABLE statements) use this connection string.
| Driver={Microsoft Access Driver (*.mdb)};Dbq=C:\mydatabase.mdb;Uid=Admin;Pwd=;ExtendedAnsiSQL=1; |
Use this one to specify the locale identifier which can help with non-US formatted dates or special character sets. The example bellow uses the en-gb locale identifier (2057)
Step 5 - Update your SQL templates
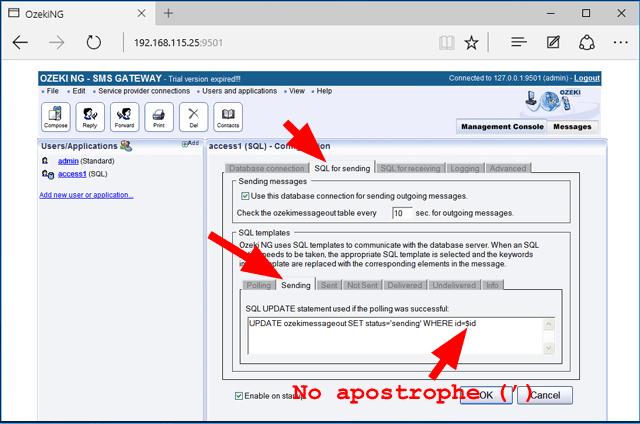
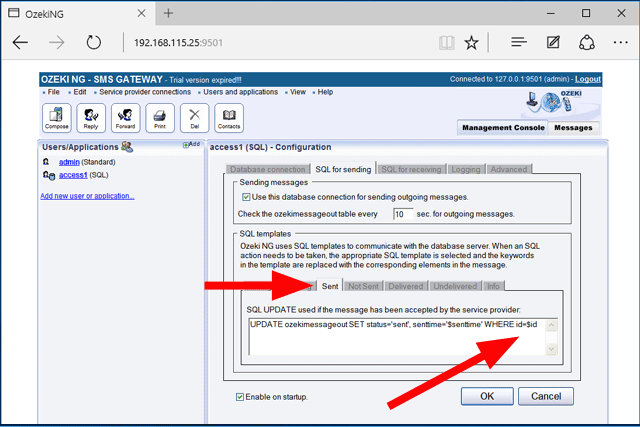
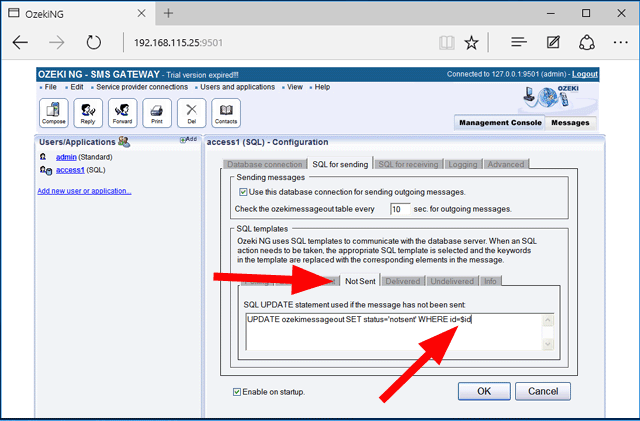
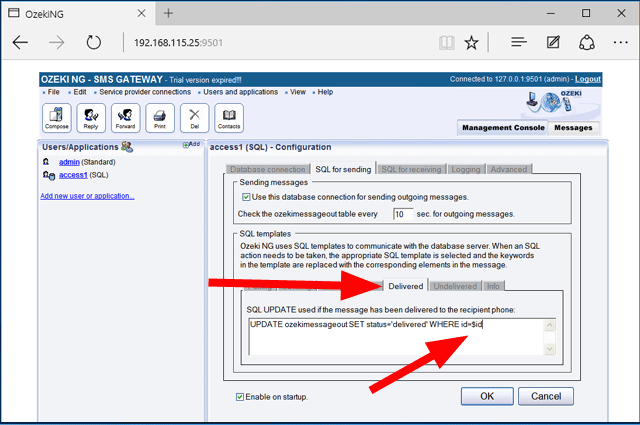
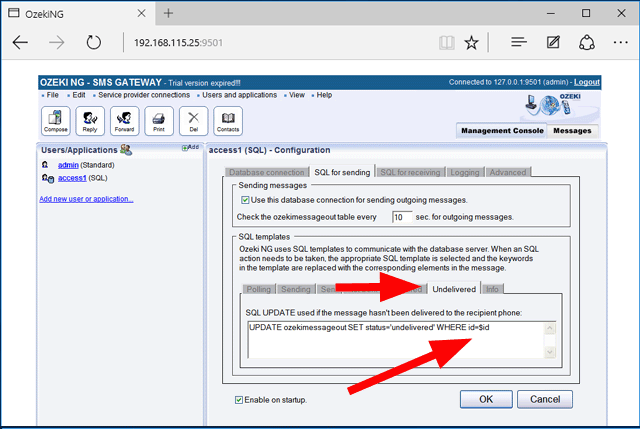
After you have set the connection string, to get the access connection working, you also have to change the SQL templates. The most important thing to do, is to remove the apostrophe around the $id keyword in all SQL templates. By default, the SQL templates used in the Database configuration are not going to work in Access. The following figures (Figure 4-8) show you which templates should be changed. The change is minor.
 /
/
Step 6 - Test your system by sending SMS from Access
After these configurations have been completed, you can send SMS messages from your access database by inserting a record into the outgoing database table. The Ozeki software will pick up your record and send it as an SMS message.
To send SMS from the Access table- Insert your messages into ozekimessageout. For each message set the status field to "send".
- Wait for Ozeki SMS gateway to deliver your texts.
- Send the SMS from your mobile phone to Ozeki SMS Gateway and wait for the SMS to arrive.
- View the sms in the ozekimessagein table in Access.
To sum it up
By following the above steps, you can create the solution quickly. Now you can use Access to send sms. You have seen the benefits Ozeki NG SMS Gateway can bring. If you have already completed the steps, I am sure, if you let your boss know, you will be rewarded. If you would like to learn more useful insights about the benefits of other similar solutions, please open ozekisms.com.
