SMPP Connection
Ozeki NG SMS Gateway is the best SMPP software. It can be installed on Windows and allows you to connect to SMPP sms services using the SMPP protocol. It can be used to send and receive text messages to mobile phones over configured SMPP connections. This page provides detailed instructions on how to setup this great SMPP software, and how to configure SMPP service provider connections to connect your system directly to mobile network operators.
What is an SMPP software
An SMPP software is an application that runs on Windows or Linux and implements the SMPP protocol. An SMPP software, such as Ozeki NG SMS Gateway can connect to the Short Message Service Centre (SMSC) of an SMS service provider and can send and receive SMS messages.
How does an SMPP software work?
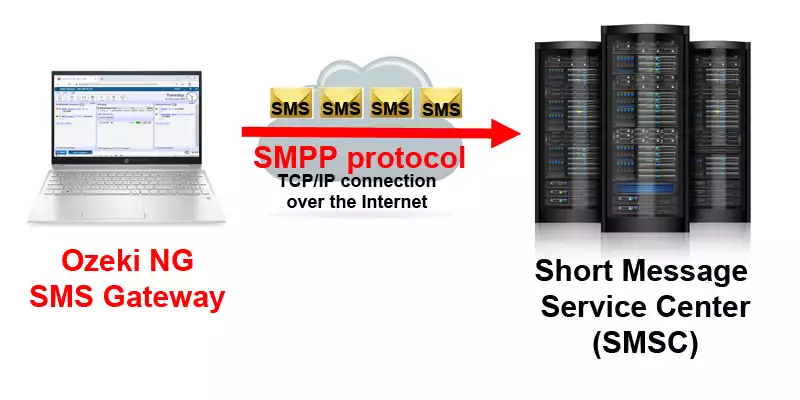
An SMPP software connects to the SMSC over a TCP/IP link. This link is established over the Internet. The SMPP protocol operates above the TCP/IP protocol. The SMSC is often referred to as an SMPP server. The software that connects to it is often referred to as an SMPP client. After the TCP/IP connection is established an SMPP bind messages is sent by the SMPP client to the SMPP server. This SMPP bind message (often called as SMPP bind pdu) carries the SMPP system ID which is your login name and the SMPP password. If the SMPP server allows your SMPP client to connect, it will send an SMPP bind resp, and considers the link established. On the established link, it is possible to send and receive SMS messages using SMPP submit sms requests.
Is Ozeki NG SMS gateway an SMPP software?
Yes. Ozeki NG SMS gateway is an SMPP software. It can connect to the SMSC using the SMPP protocol and can be used for both sending and receiving sms messages. It is important to mention, that Ozeki NG SMS gateway can also act as an SMPP SMSC, since it has a built in SMPP server.
How to setup your SMPP software (Ozeki NG SMS Gateway)
To send sms from your SMPP software use these steps:
- Type http://localhost:9501 into the browser
- Find the 'Service providers' panel in the left
- Click 'Add service provider...'
- To send SMS from SMPP you need the SMPP connection
- Click 'install' to install the SMPP protocol
- Enter the SMPP server's host and port
- Enter the SMPP username and password
- Configure the Sender ID for your texts.
- Enable SMPP low level logging, to see the SMS traffic
- Click Ok to accept the configuration
- Open the events tab to see the SMPP bind command used to connect
How to setup an SMPP protocol connection in Ozeki NG SMS Gateway
The following video shows how you can configure an SMPP client connection in the Ozeki NG SMS gateway, which is an SMPP software. If you watch the video, you will see, how to select the SMPP protocol and how to provide the SMPP server address, and the SMPP username and password to be used in the connection setup.
Installation step 1: Install the SMPP protocol
The SMPP protocol can be used to connect your computer directly to the Short Message Service Centre (SMSC) of the service provider. This connection allows you to send and receive SMS messages over the Internet or over a private IP network. To Install the SMPP protocol click on the "Add service provider" link in the Management console or in the software-s main menu.
You can install and configure this connection using the SMS gateway's graphical user interface by clicking on the "Service provider connections" menu item.
To start installing and configuring an SMPP connection, click the Add button in the top right-hand corner of the Service providers panel on the left of the Management Console interface. (To find out how to open this interface, check out the QuickStart Guide.)
You can also add a service provider connection by clicking the Add service provider item in the Service providers menu.
After you have clicked one of these, the Add service provider panel will show up on the right of the interface. The panel contains a list of protocols you can install and use for communication with an SMS service provider.
To select the SMPP protocol, click the Install link in the respective entry in the list (Figure 1).

Installation step 2: Configure SMPP
After you have installed the SMPP Connection, the SMPP configuration form will show up on the right-hand side of your screen. The first tab is the SMPP settings tab. This is where you need to enter the SMPP server details: SMPP Host name, SMPP port, SMPP username and SMPP password. These details are provided by the SMPP server (or SMPP sms service provider), after your account has been created. The SMPP host name and port are used to create the TCP/IP link the SMPP server. The SMPP username and password are used to login to the SMPP server.

After the SMPP server connection details are configured, specify the telephone number assigned to this connection and the service provider connection name. The telephone number will be used as the SMS Sender ID when you send an SMS. The service provider connection name is used in Ozeki to identify the connection.
Make sure that you choose a meaningful connection name. For example, if you have set up an SMPP connection with Vodafone, it is advisable to name it "Vodafone". Also, note that different connections should be given different names. If you have different connections from the same service provider, you can use different but similar names for them, e.g.: "Vodafone1", "Vodafone2" (or something of the like).
Tipp: SMPP load balancing
If you want to install multiple SMPP connections, and you wish to distribute the SMPP SMS traffic between them, you can create load balancing, by providing the same connection name. For example, you can create two SMPP connections and if you name both "Vodafone", the Ozeki NG SMS Gateway system will distribute the load between them evenly. For more information please visit the SMS load Balancing and the Load Balancing for SMPP SMS v3.3 page.
Tipp: SMPP Sender ID format
When you enter the Sender ID into the telephone number filed, you can pick a standard telephone number known as SMS long code, you can use a short local telephone number known as SMS short code or a phone number containing letters and digits known as Alphanumeric Sender ID.
The most common SMPP sender ID format is the SMS long code, which is a standard mobile telephone number in international format: starting with "+". For example, +3620123467 would be a telephone number in Hungary. If you send an SMS using this number in the telephone number field, the recipients will see that your SMS messages came from the mobile phone +3620123467. They will not notice that the SMS came from an SMPP software.
Tipp: Changing the SMPP sender ID on a per message basis
You might notice that there is an "override" checkbox next to the telephone number field. You can check the overridable checkbox to allow your users to customize the sender ID on a per message basis. For example if this checkbox is checked and an application is sending SMS using a Database connection, you can specify a different phone number to be displayed as the sender of the message for each SMS.
Note that the phone number to be specified in the Telephone number edit box is a mandatory value. If you leave the edit box empty, the sending will be unsuccessful.
Tipp: Configure SMPP logging in your SMPP software
Logging SMPP protocol messages can be helpful in troubleshooting problems.
To configure logging, click the Logging tab in the Configuration panel.
The tab has a Logging and a Log file settings section.
Here, you can choose whether to make the program write log entries about
sent and received messages in human readable format and/or log low level
communication. Choosing the latter option will make the program produce
logfiles containing binary codes representing the communication data.
You should check at least the Log sent and received messages in
human readable format checkbox, as logfiles can be useful in debugging
communication problems (Figure 3).

In the Log file settings section of the tab, you can make specifications for the size and the number of available logfiles. Log rotation saves disk space, as it ensures that older (and probably no longer needed) logfiles will be automatically deleted from the log directory, which is specified in the Log directory text box. By default, the access path to the logfiles is: C:\Program Files\Ozeki\OzekiNG - SMS Gateway\Logs
In the Maximum log file size text box, you can specify the maximum size of a logfile. Once this size is reached, a new logfile will be created. Specify the number of kilobytes for the size of a logfile by entering a positive whole number. By default, the maximum logfile size is 8000 kB.
In the Number of rotated files text box, specify the maximum number of rotated logfiles that are saved. Specify this number by entering a positive whole number. By default, the number of logfiles that are saved is 4 (see Figure 3 above).
If you are happy with the default settings, leave the text boxes unchanged.
Installation step 3: Select the SMPP protocol version
Ozeki NG SMS Gateway supports SMPP protocol version 3.3 and SMPP protocol version 3.4. SMPP v3.4 is the most widely used SMPP implementation in 2026. If you need SMPP v5.0, you should switch to an even better SMPP software called Ozeki 10 SMS Gateway.
By selecting either of the radio buttons (v3.3 or v3.4), you can specify the protocol version.
In the Connection tab of the Configuration panel, you can define detailed protocol-specific options and specify NPI and TON settings (in the left section) and you can make communication link management settings (in the right section).
You can specify the system type by entering its name in the System type text box. The system type is for assigning the protocol standard of the other side (SMSC). It is specified by the service provider.
To specify the bind mode, select one of the three radio buttons: Transmitter, Receiver or Transceiver.
The bind mode describes the way of communication between Ozeki NG - SMS Gateway and the SMS Centre of a service provider.
- Select Transmitter if you use this connection only for sending SMS messages.
- Select Receiver if you use this connection only for receiving messages.
- Select Transceiver if you use this connection for both sending and receiving messages.
In this section you can also find boxes for NPI and TON settings. NPI is short for Network Protocol Identification. TON is short for Type Of Number. In each of them, you can enter numbers. This information is provided by the GSM service provider (Figure 4).

In the right section of this configuration panel, you can manage communication links. At first, in "Windows size" line you can increase the window size, if your SMPP service provider supports windowing.
If you check the checkbox in the Communication link management section, you can make the program send keepalive packets to maintain connection. Proxy servers will drop a connection after a short period of time if there is no activity on it. Keepalive packets are sent during idle periods to keep the connection open.
In the Keepalive period edit box you can specify the maximum length of idle connection between the Ozeki NG - SMS Gateway and the SMSC. You can specify it by giving the number of seconds in numerical characters representing any positive whole number. If you are content with the default specification (30 seconds), leave this edit box unchanged.
You can also check the Slow down communication to checkbox (you can provide the exact time in MPM) if your service provider cannot accept messages at a high speed.
Installation step 4: Configure SMPP submit and SMPP delivery report format
To configure the SMPP submit sms format used to send SMS messages, you need to open the "Message submission" tab. On this tab page, you may also configure the SMPP delivery report format to be used by the Ozeki SMPP software.
In the Message submission tab, there are two sections: Delivery reports and Submit timeout handling. In "Delivery reports" section you can enable Request delivery reports option. Delivery reports give you message delivery status for submitted messages. They are returned by the service provider when a message arrives to the recipient handset. Then specify the date format used by your service provider in delivery reports in Delivery date format line.
In Submit timeout handling sector you can specify the preferred way to handle submit timeout. In the Submit timeout edit box you can specify the maximum waiting time for an SMS Center response confirming that your message has been successfully submitted. Successful submission means that the SMS Center has accepted the message for delivery. You can specify the waiting time by giving the number of seconds in numerical characters representing any positive whole number. If you are content with the default specification (60 seconds), leave this edit box unchanged.
You can choose how to consider a message you have sent if there is no response from the SMS Centre after the specified length of time. Select one of the three radio buttons.
- Select Sent to consider a message sent even if there is no response from the SMS Centre.
- Select Not sent to consider a message not sent if there is no response from the SMS Centre.
- Select Retry later to make the program try to send a message later if the SMS Centre has not confirmed its status as sent. Then, the message will be placed last in the outgoing message queue and sent out again when it is its turn (Figure 5).

In Message data tab you can see two sectors: "Character encoding of text messages" and "Message data transport" (Figure 6). First, you can specify the preferred character set (Default, ISO_8859_1, UCS2, GSM7bit) and the character encoding policy (Best match, Transform, Enforce).
Best match: Convert to preferred character set if lossless conversion is possible. (Character substitutions are not allowed.)
Transform: Convert to preferred character set if possible. (Character substitutions are allowed.)
Enforce: Always use the preferred charset. (Character substitutions and character losses are allowed.)
Then you can enable one of the following options if it is required: Use GSM 7-bit packed encoding, Encode @ sign as iso 8859-1 character, Convert incoming GSM 7 to iso 8859-1.
In "Message data transport" section you can enable segmentation and reassembly (SAR), to automatically split outgoing messages and reassemble incoming messages if needed as long messages should be sent through the mobile network in several parts.
As some service providers might ask you to use TLV fields instead of the standard SM field in this section you can select from these options:
- Put UDH into TLV for binary SMS
- Put UDH into TLV for text SMS
- Put msg data into TLV instead of SM field

The last tab is Encoding in Configuration panel. There are the following sections: ESM Class field, Number format encoding, DCS field, Service type.
In ESM Class field you can enable these options:- Put Delivery Report Req. into ESM class
- Put UDHI into ESM class for text SMS
- Put UDHI into ESM class for binary SMS
In case your service provider asks you to set ESM class field to 00 for all messages, please make sure the following options are NOT checked.
In Number format encoding section, you can specify TON and NPI numbers; in the other two section you can specify DCS that determines the charset, the message class and binary message encoding, and service type parameter of SUBMIT SM PDU (Figure 7).

The Configuration panel for service provider connections contains a Connect automatically on startup checkbox (in the bottom left-hand corner). If it is checked, Ozeki NG - SMS Gateway will automatically initiate a connection with the SMS Centre when the program has started. If this checkbox is not checked, the connection has to be initiated manually.
Installation step 5: Start the SMPP connection
Once the SMPP protocol is configured, your Ozeki SMPP software is ready to be used. You can start the connection by clicking on the Connect link of the left-hand side of the screen. (Figure 8).

You can open the panel of a service provider connection by clicking its name in the Service providers panel in the Management Console.
The panel of a service provider connection consists of three sections. In the upper section you can find the name of the service provider connection (with the name of its protocol in brackets). You can see an icon showing if the service provider connection is connected. If it is not, the icon is marked with an "x".
To the right of the icon, you can find links to perform different operations.
- Configure: to configure or modify the configuration of an installed service provider connection. Clicking this link will take you back to the Configuration panel.
- Events: to view the logging of the latest server events related to the service provider connection. Clicking it will bring up the Events panel containing the logging of the latest server events.
- Connect: to connect the service provider connection with the SMS Centre.
- Disconnect: to disconnect the service provider connection from the SMS Centre.
- Uninstall: to uninstall the service provider connection.
In the middle section of the panel, you can see some of the most important configuration information. The options that have been (re)activated during the configuration are marked with a tick. The options that have not been activated or those that have been deactivated during the configuration are marked with an "x".
In the lower section of the panel of the service provider connection you can read some information about its protocol.
FAQs
What is an SMPP connection?
The Short Message Peer to Peer (SMPP) protocol acts as a common language for SMS communication within mobile networks. It's an open standard, meaning anyone can implement it, ensuring broad compatibility.
SMPP provides a flexible interface for transferring short message data between various entities:
- External Short Message Entities (ESMEs): These can be applications like Ozeki NG SMS Gateway that send or receive SMS messages.
- Routing Entities (REs): These entities manage message routing within a network, directing messages to the appropriate destinations.
- Message Centres (SMSCs): These are central hubs within mobile networks that handle message storage, forwarding, and delivery.
Here are some key uses of SMPP:
- Connecting Applications to SMSCs: Ozeki NG SMS Gateway leverages SMPP to connect to the Short Message Service Centre (SMSC) of your GSM service provider over an IP link (internet or leased line). This enables sending and receiving SMS messages through your software.
- Network Compatibility: SMPP extends beyond GSM networks. It's also used in TDMA, CDMA, and PDC networks, making it a widely adopted protocol within the mobile telecommunications industry.
Security Considerations:
The IP connection between your computer and the SMSC can be secured using a VPN (Virtual Private Network) to add an extra layer of protection for sensitive data.In essence, SMPP acts as a foundation for SMS communication, enabling applications like Ozeki NG SMS Gateway to interact with SMSCs and facilitate message exchange within various mobile networks.
How can I use SMPP to send/receive SMS messages?
To leverage Ozeki NG SMS Gateway for sending and receiving SMS, you'll need an SMS service provider that supports the SMPP protocol.
- Setting Up the SMPP Link: Refer to the Ozeki NG documentation's "SMPP link setup page" for detailed instructions on configuring the connection between your software and the provider's SMPP server.
- Virtual Number (IMSI): Discuss obtaining a virtual number (IMSI)
with your provider. This is the number people will text to reach your service.
It can be an international number, a national number, or a short code.
National/Short code: These options limit accessibility to users within the same country.
International Virtual Number: This allows users from anywhere in the world to send messages to your service. - Automatic Routing: When someone sends an SMS to your virtual number, the message will be automatically routed to your Ozeki NG SMS Gateway through the established SMPP link.
The good news: Ozeki NG is typically configured by default to receive SMS messages on all SMPP connections. This is called "transceiver mode," allowing both sending and receiving on a single connection.
To enable receiving:
- Contact your provider and request them to configure their system for receiving messages.
- During this conversation, you'll likely receive the virtual phone number (or short code) associated with your account.
- Once their system is configured, any messages sent to that number will be delivered to your Ozeki NG system instantly. You can then track these messages in the event log.
If your provider uses an older SMPP version (likely SMPP v3.3), you might need to set up two separate connections:
- Sending: Configure this connection in "transmitter mode" to handle outgoing messages.
- Receiving: Configure this connection in "receiver mode" to manage incoming messages.
By following these steps and working with your chosen SMPP provider, you can unlock the full potential of Ozeki NG SMS Gateway for both sending and receiving SMS messages.
What kind of parameters do I need to connect to an SMPP service provider?
To connect Ozeki NG SMS Gateway to your SMS service provider for sending and receiving SMS, you'll need to configure some essential settings related to the SMPP protocol.
- SMPP Server Address (or Hostname): This is the location of your provider's SMPP server, similar to a website address. It can be either an IP address like "192.168.1.10" or a hostname like "[invalid URL removed]".
- SMPP Port Number: This acts like a specific door on the server. The default port number for SMPP is typically 2775, but it can vary depending on your provider. Check with them for the correct port number.
- SMPP Username (System ID): This is your login credential for the SMPP server, similar to a username for other online services. Your provider will provide you with this information.
- SMPP Password: This is your secret code for the SMPP server, like a password for other accounts. Keep this information secure!
- SMPP Version Number: Ozeki NG SMS Gateway supports SMPP versions 3.3 and 3.4. Your provider will tell you which version their server uses.
- System Type: This is an optional setting that might be required by your provider for identification. It's usually a short text string like "SMPP". Consult your provider if needed.
- Sender Address: This is the default phone number that will appear as the sender on all your outgoing SMS messages. You can customize this for specific messages later if needed.
- Address Range (Receiving): This setting is primarily used for receiving messages. It informs the SMSC (Short Message Service Centre) about the range of phone numbers you can receive messages for on this SMPP connection. This is useful if you manage multiple phone numbers through a single Ozeki NG connection.
By providing these essential settings, you'll establish a successful connection between Ozeki NG and your SMS provider, allowing you to leverage the power of SMPP for sending and receiving SMS!
What is an SMPP transmitter connection?
Within the Short Message Peer to Peer (SMPP) protocol, a transmitter connection serves a specific purpose: the transmission of SMS messages. Functioning as a dedicated outbound channel, this connection type enables Ozeki NG SMS Gateway to send SMS messages to the network operated by the SMS service provider. However, it is not capable of receiving incoming messages.
Key Characteristics:
- One-Way Communication: The SMPP transmitter connection facilitates unidirectional communication, making it suitable for scenarios where the primary requirement is to send SMS messages. This could include applications such as bulk SMS notifications or alerts.
- Potential Requirement for Older SMPP Versions: In instances where an SMS service provider utilizes an older version of the SMPP protocol (specifically, version 3.3 or below), separate connections might be necessary for sending and receiving messages. An SMPP transmitter connection would then be required for outbound communication.
What is an SMPP receiver connection?
The Short Message Peer to Peer (SMPP) protocol allows for the establishment of dedicated receiver connections. These connections serve a distinct purpose: receiving SMS messages. Functioning as an inbound channel, this connection type enables Ozeki NG SMS Gateway to accept incoming SMS messages from the network operated by the SMS service provider. However, it is not capable of sending outgoing messages.
Key Characteristics:
- Inbound Messaging Focus: The SMPP receiver connection facilitates the reception of incoming SMS messages, making it suitable for scenarios where the primary requirement is to collect or monitor incoming messages. This could include applications such as receiving customer SMS replies or collecting data for specific services.
- Potential Requirement for Older SMPP Versions: Similar to the SMPP transmitter connection, separate connections might be necessary for sending and receiving messages with older versions of the SMPP protocol (specifically, version 3.3 or below). In such instances, an SMPP receiver connection would be required to receive incoming messages.
What is an SMPP transceiver connection?
Within the Short Message Peer to Peer (SMPP) protocol, the transceiver connection offers a comprehensive functionality. This connection type acts as a single, unified channel, enabling Ozeki NG SMS Gateway to both transmit and receive SMS messages on the network operated by the SMS service provider.
Key Characteristics:
- Two-Way Communication: The defining feature of the SMPP transceiver connection is its ability to facilitate bidirectional communication. This makes it the preferred choice for most scenarios where two-way SMS exchange is required, such as sending and receiving SMS confirmations or managing interactive SMS services.
- Efficiency and Convenience: By utilizing a single TCP/IP connection for both sending and receiving messages, the transceiver connection offers both efficiency and convenience. This eliminates the need for separate transmitter and receiver connections, simplifying configuration and management.
- Compatibility with Newer SMPP Versions: The SMPP transceiver connection is typically supported by newer versions of the SMPP protocol (v3.4 and above). However, for older versions (specifically, v3.3 or below), separate transmitter and receiver connections might be necessary.
Benefits over Separate Connections:
Compared to using separate SMPP transmitter and receiver connections, the transceiver connection offers significant advantages:
- Simplified Configuration: Only one connection needs to be established and managed.
- Streamlined Communication: Two-way communication is facilitated on a single channel
- Improved Efficiency: Reduces the number of required network connections.
In conclusion, the SMPP transceiver connection serves as the most versatile and efficient option for two-way SMS communication within the Ozeki NG SMS Gateway framework, especially when utilizing newer SMPP versions.